Showing posts with label kitchen renovation. Show all posts

Monday, November 09, 2009

What a Difference!

What a difference some hot glue and beaded trim makes!

Before on the left and After on the right:
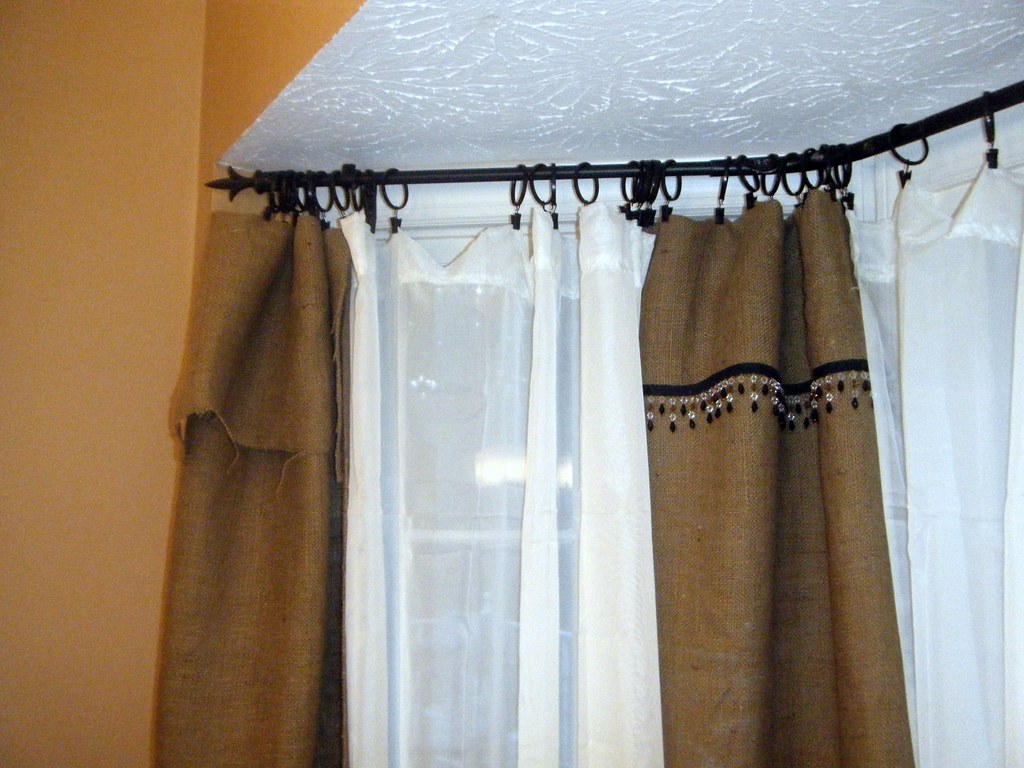


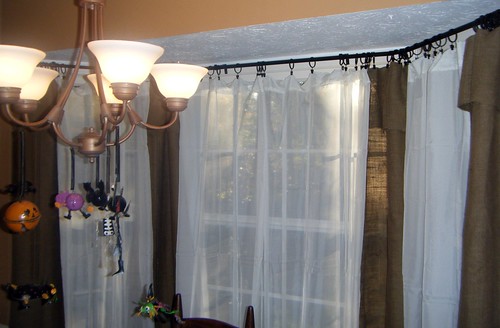
Burlap Curtain Project Review:

1.  I did this on a bay window.  It would normally be very simple to do the hardware for the project, just have 3 straight curtain rods and 2 swivel socket connectors.  Put them together and install.  However, Ikea's connector was for a 90 degree angled wall and the angle for my bay windows was not.  Thus, the blow torch that I mentioned in an earlier post.  It would have been much simpler to use a swivel socket connector.  This carries on the tradition of my making every single project I touch much more difficult than it needs to be!

2.  My burlap panels are not going to be closed, they will stay as they are in the pic above.  So I cut the panel in half, approx. 24 inches wide.    If they were to be closed I would have left them at 48 inches wide, but that wasn't necessary for these windows.

3.  No sewing necessary!  I added 9 extra inches to my finished length.  1 inch to be turned under at the bottom for the hem and hot glued and 8 inches to be folded over in the front for a faux valance-y kinda look.  Obviously I do not know the formal name for this type of curtain.  Normally you would put the black part of the trim to the inside of the flap, but I wanted the black trim to echo the black bar above and the knobs on the cabinets.

4.  The panel is hung on the alligator clips attached to the rings.  So, you don't need to sew a pocket for the rod or put in grommets.  Grommets are not my friends.  They don't like me very much.

5.  For the bay window, I did 4 total panels of burlap, which was super cheap.  It was $2.99/yd and I had a 40% off coupon from JoAnn's.  The trim was purchased there as well.  I only used about two yards.  I got this on sale as well.  There are also 4 sheer panels that I found at Big Lots for $5.00 a piece.

Here's how I hung them up:  Panel, sheer, panel, sheer, sheer, panel, sheer, panel.  Or, one panel on each side and one in between each window.

6.  These go down to one inch above the floor.  I wanted a more dramatic look in the breakfast nook than shorter curtains would have given me.

So my breakfast nook is now complete:  (Please ignore studious boy doing homework)


I added new chair cushions and table cloth and it's finally done!  I love all the colors and textures in my kitchen now.

Tuesday, November 03, 2009

Burlap Curtain Progress

The curtains are coming along.  I'm almost finished.  I still need to add the trim and then hot glue my hems down.  I refuse to sew the burlap.  I've already got a mountain of fuzz and lint from it in my dryer, I don't want it in my sewing machine as well.   It already needs a tune up, the last thing it needs is burlap abuse.  Here's how they look currently:


Look at how the sunlight shines through the burlap.  I love the texture it's bringing to the kitchen.  The burlap panels will never be moved.  Only the sheers will open and close.  The burlap is only there for color and texture.  I have a ton of the burlap left over.  I'm planning on using that to make a valance for the window over the sink.   If I get around to it, I'll put the trim on tomorrow and will give you a finished project pic then with details on how I did the whole thing.  This would be a piece of cake if it was just on a straight rod.  I'm already over the whole bay window thing, trust me.

Oh and yes, those are Halloween decorations in November.  Why do you ask?

On the writing front, I'm still about 800 words behind on my goal.  The night's not over yet of course.  I've written  over 1,000 words so far today and I'll have more time to write this evening.  I'm already doing better than I did last year, and I'm only three days into nanowrimo.  Cool!

Thursday, October 22, 2009

Curtain Talk

I'm tackling the windows of my kitchen this week.  This is a tough one for several reasons:

A.  I'm not good with curtains.  I have a difficult time envisioning treatments on windows and when I think about an idea for them, I usually think "that's totally going to suck" and never do them.  The exception being the roman shades in the boys' room.  I love those.

B.  It has to be dirt cheap.  Cause we're broke.  Have you priced curtains lately?  I know I'm going to have to make them myself.

I think I've found a great fabric that is cheap and will bring in texture and has a color that will fit in brilliantly with my kitchen:  Burlap!  I found a few examples on line that I really like and will be super easy to make.  The most expensive part will be the bay window curtain rod.

Here's one example that I particularly love:


  You can see the whole writeup on this over at the Living My Life Outside the Box blog.  She did such a fabulous job with this!

I also want white sheers to go in between the burlap panels that can be closed when the sun gets too hot.  I also want them to be almost floor length. 

I'm off to the store with all my window measurements!

Tuesday, September 22, 2009

What Happened to My Interwebz?

Remember when I said that we got between 12" and 16" yesterday?  Add another 3" to 5" for the area, okay?  No, there's been no damage here, other than school being out.  Have I told you that I hate having school out?  I can't get anything done with the kids in the house!  Seriously though, I find it very difficult to believe that kids are out of school today because of rain.  I know that there are lots of roads and major highways washed out due to flash flooding, but still. 

My internet has been out the whole day thanks to the storms.  It's 8:03 pm and I just got on.  The DT's were setting in.  Or, as my Mom called it, the Down Technologies.  Really, I think I was getting the shakes.  Internet addiction is a terrible thing, I tell ya!

Now, I'm off to put up more cabinet doors by myself.  I've found out that it's very difficult to do by yourself.  Doable, but difficult.

I can't wait to call it a night so that I can go curl up with my knitting and some Top Gear, Oh Yeah!  I love guy shows and movies.  None of that chick flick, gotta find a boyfriend or my life is ruined and I need a good cry kind of movies for me.  (Almost sounds like a country song doesn't it?)  No sir.  I have enough trials and tribulations in my life already.   Just lots of fast cars, excitement, blowing things up kind of fun for me! 

Monday, September 21, 2009

More Paint and More Knitting

I'm so sick of rain and thunderstorms!  We've had between 12" and 16" in the last 24 hours.  Can you believe it?  There are school and road closings due to flash floods.  My yard is washing away.  Oh and do you know how difficult it is to get paint to dry with this much rain? Very.


Here's how my cabinets currently look after more painting this weekend and today.


Here's a bunch (not all) of my cabinet doors:


I have been finding a small amount of time to knit as well.  I have finished both the front and back of the Quidditch sweater.  I've also started one of the sleeves.  I've had to mod the sleeves and I'll give all the details on that later.  So here's how it currently looks.


I have to go unplug my computer now.  Too much lighting to stay on long!

Tuesday, September 08, 2009

This is a knitting blog, right?

I've been feeling awfully artsy/craftsy lately.  For instance, over the past couple of days I've been working on more counter tops.  Specifically, the counters that are on either side of my stove.  I'm having to take the counters on in tiny little steps due to lack of time and dealing with children, but it's getting done!

But alas, it's been digging into my knitting time.  I'm not saying that I haven't been knitting, ya know, but I'll show you a report on that tomorrow.  It's hard to get crafty people to be completely monogamous with their hobbies, isn't it?

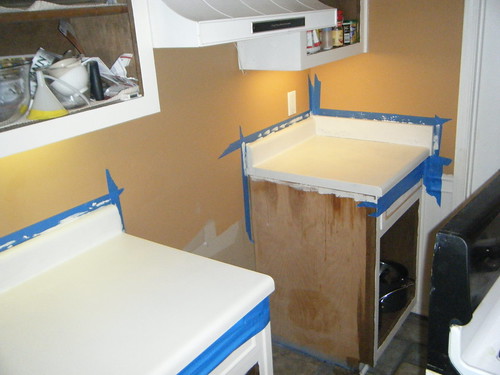
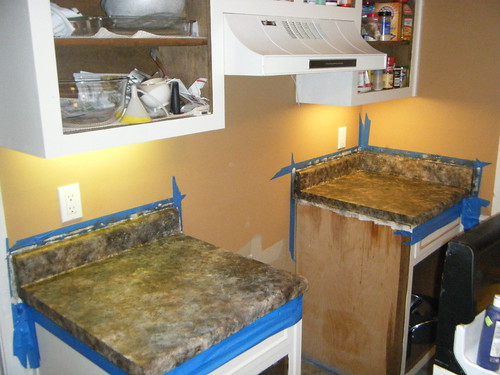
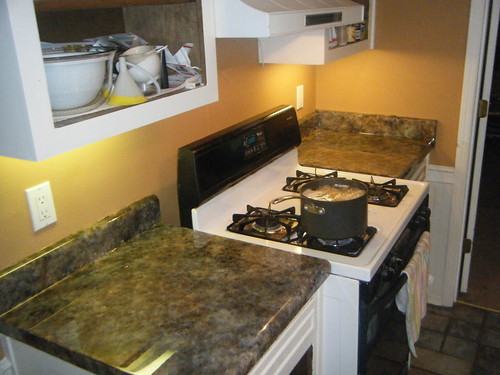
Back to the counters.  Here's a couple of in progress shots:


Once again, I almost forgot the before and after.  The one on the left has the first base coat of paint, the right is the original counter.

Both with a base coat.

Faux finish applied, but no resin
And this is how it looked a few minutes ago with the resin and paint touchups!

Please ignore the crap shoved into the cabinet on the left.  Having cabinets open has allowed all sorts of things to land there, like coupons and other misc. paper.  I couldn't get the stove shoved all the way back in by myself today.  It's stuck on something.  When the hubby gets in today, that'll be his job.

There's only one more counter to go, but it's a doozy.  It's easily the size of the other two combined and we are going to have to pull the sink out of it to do it right.  That's also the spouse's job since that's not something that I'm qualified to do!

I'm very pleased with how all of this is turning out.  Oh, and by the way, the new resin (EX74) is working out beautifully.  I've gone out and purchased a resin mold to make jewelry with it as well as using it on the counters.  It's way too much fun to let it just sit in bottles. 

Thursday, September 03, 2009

Counter Top Follow Up

Several people have asked where to get the Envirotex Lite and the cost.  If you are just looking for a small amount, you can check out places like Michael's.  At my local Michael's, they were carrying this product only in the 8 oz sizes at $11.99.   This size only covers about 2 square feet.  That's not enough to do the job on my huge kitchen.  Just one counter in my kitchen is 10 sq. feet.  I don't think they carry enough in stock to do what I need to do.  Another Michael's may carry larger sizes.  If they do, that's where your Michael's coupon will really come in handy.

However, You can go to the www.creative-wholesale.com website and they carry the product in the gallon sizes for $58.99.  There's also a product called EX74 that is basically the same product but has a UV filter in it to prevent yellowing, which would be really great for a sunny kitchen.  It also has more "open time" which gives you a little more leeway in spreading and getting rid of the bubbles.  Instead of 25 minutes of working time with the Envirotex Lite, you get an hour's worth of working time. You can get a 2 gallon kit of the EX74 for $105.83. 

Basically, for me it's a size and ease of use issue.  I'll probably be going with the EX74 to complete the rest of the project.  Of course, your mileage and product may vary.

As always, remember to follow the directions completely and keep safety a priority when using these products!  Wear gloves, no open flames, lots of ventilation, etc. etc. etc.

Monday, August 31, 2009

New Countertop! Sorta

Wait until you see this! As most of you know, I've spent the past year doing a kitchen renovation. That would be with a capital "I" by the way. As in "I" am doing a kitchen renovation pretty much by myself. This is what has lead to the project taking an entire year.

First, there was the three, yes three, layers of wall paper to be dealt with. The bottom third layer had no primer underneath so I had to leave it on the walls. I primered over it twice before painting the pumpkin color that is on there now.

Second, the cabinets, that are still not finished. I'm getting there, I promise. My dad came and put wood trim on the cabinet and door fronts. You'll see that in just a sec. I finished painting two set of cabinets and have yet to do the third. You guys, this is a huge kitchen!

Third, and this is what today's post is about, is the countertops. We have been living with the most horrible blue laminate countertops. I cringe when I look at them. I've been abusing them so badly, cutting on them, putting really hot stuff on them and it's made no difference. They're still there. Or, at least, they sort of are.

See, we have an extremely tight budget with no room for budgets or errors. Go ahead and read that as we're almost broke. Go ahead, I don't mind. Being broke is not such a bad thing sometimes, it leads to more creativity. And boy, did we have it in Spades this weekend. Yeah, you read that right, I said "WE". My Mom was the lovely assistant on this project. Thanks to a post over on Craftster, I got inspired.

Here's where we started:


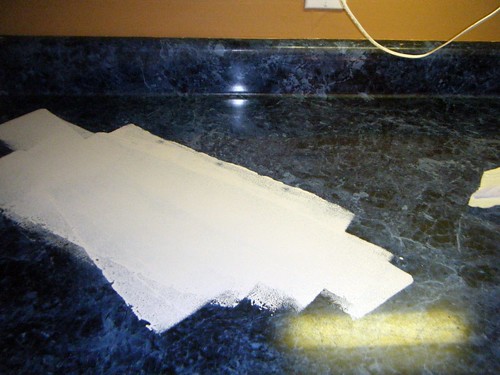
Notice the hideous blue on the countertop. I almost forgot to do the before pic. I remembered after I started the base coat.

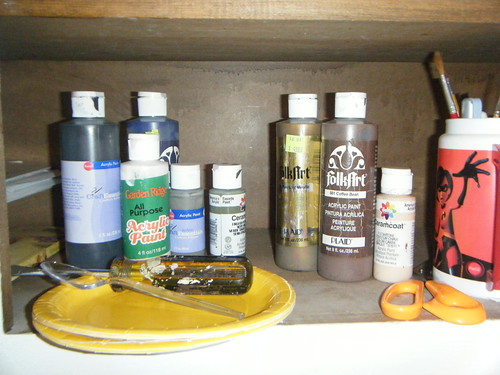
For the base coat, we used the same paint that I'm putting on the cabinets, a biscuit color. Once this dried, we began applying paints using about six different natural sea sponges. The paints were all acrylic craft paints, seen here:


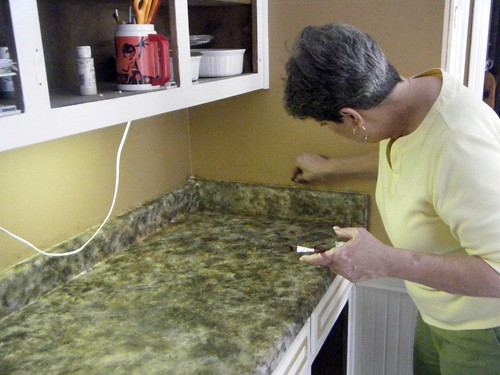
Here's my lovely assistant slaving working away:


The next step, once everything was dry and the Youngest was in bed (around 8pm) we started the cool part. We applied resin. Specifically, Envirotex Lite. I had used this resin before when making study boards. Those were so cool, but I'll have to tell ya about those at another time. Anyway, there's very little time or room for error when using this product. Once mixed, you have 25 minutes to get it the way you want it before it begins to harden.

I only did one countertop this weekend. I wanted to make sure it was going to work before moving on to all of them. This section was 9.66 square feet not including the back splash. I have three more countertops to go, two small ones and one that is about 20 square feet. I figured if the project didn't work, I would just rip it out and buy more laminate which would cost around $1100 dollars if someone else installed it. Installing laminate is not my thing.

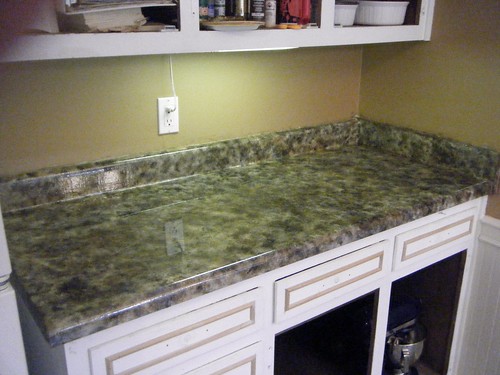
Here's how it turned out:


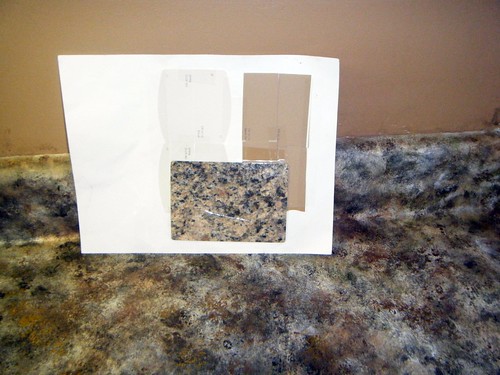
Oh, and just to show you how good we really are, (I'm not bashful am I?) here's a laminate sample that we used as an example that had all the colors that I was going for:

Not bad huh?


I'm so incredibly proud of this project.

We only did one coat of resin. I have one or two more coats to pour on and give it a little more strength.

When all is said and done, we will have saved about $800.00 dollars on this diy countertop project. What do ya think? Doesn't look like laminate now, does it?


ETA the Legalese:  Please if you try this make sure you do it safely!   Resin can be toxic if handled improperly.  Use gloves to minimize skin contact and do this in a well ventilated area.  Also, the directions tell you that you can use a torch to help get rid of the bubbles.  If you do this, and I didn't because I chickened out, please follow the directions to the letter! Carbon dioxide is what makes them release.  I used a straw to blow on the bubbles to release them.  I didn't want my house to burn down in the middle of my craft project.