Thursday, January 29, 2009

Over Ambitiousness

After making the Soon to be Lost toddler mittens, I got all excited about making up another set of mittens. I knew that I wanted them to be fingerless and I wanted them for me. So out came some scrap yarn and needles and I began to play.

I can now with confidence say that I am amazed by the designers out there. Some of them just whip up a pattern and say "ta-da!" Um, I'm not one of them.

I got all over-ambitious. I wanted baby cables and I wanted eyelets and I wanted them to spiral and I wanted it now and for it to be all perfect.

You wouldn't believe how many times I've ripped these things back out. I threw out the spiral idea, but kept the others. The mitts have gone through many shapes and phases. I just haven't been real happy with what I've come up with.

This is the current look, but again, I will probably rip this too since I'm not real thrilled by them. I don't like how the eyelets are sitting right next to the cable. It makes the cables look like I made huge mistakes.


But that's okay. I'm considering this a learning process. I just keep repeating to myself, "baby steps, baby steps". There's not one designer out there that didn't start with baby steps. Unless they're super mega talented prodigies of course. I don't think I can be classified in that category.

So that's what I've been doing. Ripping back everything I've touched in the past couple of days. :sigh:

When and if I ever get these done, I'll write them up and put them up for everyone. But I need to warn you, the finished product may not even resemble the ones before you!

Wednesday, January 28, 2009

No Sew Dorsal Fin Tutorial - Image heavy

I apologize to those who are looking for knitting or spinning. I'm afraid this post is going to be geared towards costuming. Specifically, making a shark dorsal fin. Obscure huh?

I directed a children's play last night. The kids were fantastic in it. Five of the characters were sharks. We decided to put the kids in gray or blue sweats for the body and add a dorsal fin. One of the kids put teeth and eyes on the hoodie and it was way too cute.

I decided that I would share my method of making a no-sew dorsal fin in case someone else in this wide world needed to make one for a stage play or just for a Halloween costume. So here goes: (click any of the pics for better viewing of the directions)

12 x 18 in. stiff felt

Fold like a book

Staple top of bookKeep it opened


Recycle!

Double this amount


Basically, it's worn like a back pack.


Yes, there are tons of staples. This was done for the stage where the staples could not be seen from the audience, so it didn't need to be clean, just quick and dirty. You may want to do this with hot glue for a cleaner look.

Sorry this is so image heavy, but I hope it helps someone, somewhere!

Tuesday, January 27, 2009

fleece dyeing

In my present attempt at going from sheep to sweater, I decided to dye the Corriedale fleece that I had in the garage. The color ranged from light gray to dark brown to begin with.

I got out my Lanaset dye starter pack and my new big enamel pot and went to town.

I was aiming for a deep dark brown. I got out the bordeaux, teal green and yellow. Of course I had no recipe and no idea how to get the color that I wanted. Like everything that I do, I winged it. I'm not exactly the sharpest crayon in the box. Do as I say, not as I do. Why?

I had approximately 2 lbs. to dye - that meant (according to the directions) that I needed 4 tsps. of dye. I grabbed the bordeaux first and put a tsp of it into a glass jar, then a tsp of the teal. Then I made my first mistake. I thought I was grabbing the yellow, but what did I do? I picked up the bordeaux again and put another tsp in. oops. Now I had to correct my mistake. I added the tsp of yellow that meant to add and then anothe 1/2 tsp more. From that point, I just played mix the colors. There's no way I could ever duplicate what I did. I added some plain red into the mix, a little black and more green.

I didn't think it would ever stop. I wasted quite a bit of my dye, but kept going anyway. (I'm stubborn that way.)

The next disaster to occur was with my candy thermometer that I had planned on using to make sure the whole shebang got to 200 degrees. Yep, it was broken, so I mostly winged that too. I knew that I just needed to keep it from boiling and went from there.

At this point, I was worried that I ruined all my work with this fleece. It had made it through the cleaning process without it felting, but I wasn't so sure it would make it out of this process still usable. But it did!

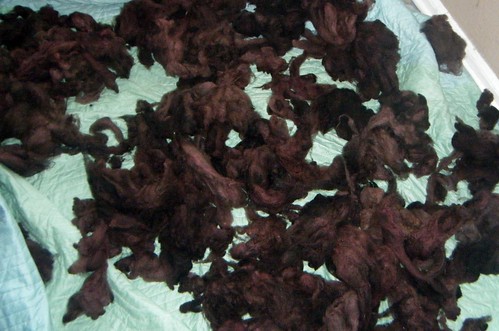
Of course, it's not the color I intended, but I love it anyway. It's a beautiful rose-brown and once it's carded and spun, will be a lovely brown yarn.

I was so happy until the Youngest said, "Mommy, Look at all dis poop!" He's kinda right, at this point, it does look like that:


But up close, the color gets better:

This weekend probably wasn't the best time to do this. We had the pinewood derby and I was supposed to be preparing for the children's play I'm directing tonight at the Eldest's school. (I'll give you an update on that and a costume tutorial tomorrow.) But it was fun to do anyway. I love being busy with arts and crafts!

Monday, January 26, 2009

Harry Potter Pinewood Derby Car

Any Harry Potter fans out there? If so, you'll like what you're about to see.

The Eldest competed in the Cub Scouts Pinewood Derby on Saturday. I always try to steer him toward making an original car for the derby and mostly, he listens. He's a huge Potter fan so we went with a Harry Potter broomstick theme. I present to you, the Firebolt.
Click to enlarge for better detail!


Turned out to be very cool and really fast. Notice the lighting bolts on the side? The Eldest said that he wanted those on to represent Harry's scar.

To make the broomstick, I sacrificed some bristles from my broom and painted them brown then using masking tape, taped them together at the top and over the handle of the broom. The handle is twist paper from the handle of a paper bag that I coated in Aleene's tacky glue and then placed over a flame. When it was all sooty, I burnished it with a cloth and then applied rub n' buff to it. Lastly, I added a bit of orange and gray paint to the handle. I then painted the masking tape gold. To make the bits that hang off the broom, I took hot glue and glued my countertop in the shape that I wanted it. After it cooled, I simply peeled it off and glued it to the broom and painted it gold as well. Simple. The completed broom was then hot glued to the car.

It was a huge hit with the adults at least. I know that I had fun making it.