Wednesday, September 15, 2010

Happy Birthday Eldest!

Today is my oldest baby's tenth birthday!  Happy Birthday Eldest!


The Youngest is having a tough time with his brother getting the spotlight today.  He wanted to know why The Eldest was keeping him from having a birthday.  He hasn't quite gotten the concept of each person having his own special day.  He's also mad as all get out that I put all those minifigs on the cake.  He'll get over it.

2010_09150002


We're foregoing a big party this year.  The Eldest has chosen instead to go to a video arcade place with one special friend instead.  Yay!  No party stress for Mom!  We opened presents first thing this morning and both boys were tickled to death to get birthday cake for breakfast!

Tuesday, September 14, 2010

Lego Birthday Cake Incident

"Creativity is the ability to hide horrible wrongs artistically."  - Shea

I stand by my statement.  This has served me well through many projects that had serious flaws and my son's 10th Birthday cake is no exception.  This was supposed to be a ridiculously simple cake.  Now why is it that I get the words "simple" and "difficult" backwards so often?  Difficult cakes?  No problem.  Simple cakes?  I totally screw them up.

Take the Lego cake for example.  Simple concept, should have been easy.  I took a 9 x 13" cake and chopped off one side.  I took a small cup and made "biscuits"  in the chopped off side and then cut them in two so that I would have two circles from each.  I then frosted the cake, placed the circles on top, then frosted those.  See, sounds simple doesn't it?

Well.  The cake was crumbly and mixed with the frosting.  I couldn't get the frosting to go around the circles right.  Some of the circles are lopsided.  D@mn.   To be honest, the cake looked like a torso with eight breasts.  Unless you're a hormone raging teen boy, it's very unappealing.  Oh, and the Youngest made a hole in the side with his fingers when I wasn't looking and that didn't help matters either.   This is officially the worst birthday cake that I've made so far.

So what's a gal to do when something like this happens?  Disguise the mess!

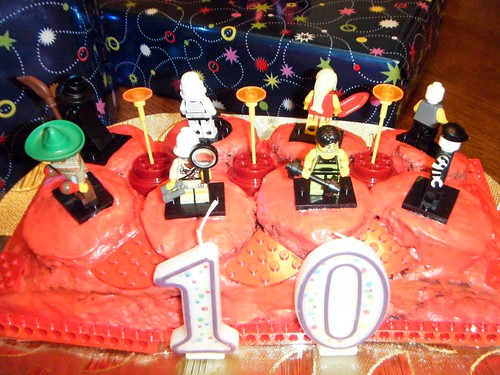
I raided the boys' Lego bucket for embellishments.  I found quarter round red pieces, long red pieces, round red wheel bases, eight different colorful minifigs and three antennae thingies.  Wanna see how it turned out?


Lego Birthday Cake 3


The 10 candles hide the hole made by little fingers pretty well, don't they?

Lego Birthday Cake 1


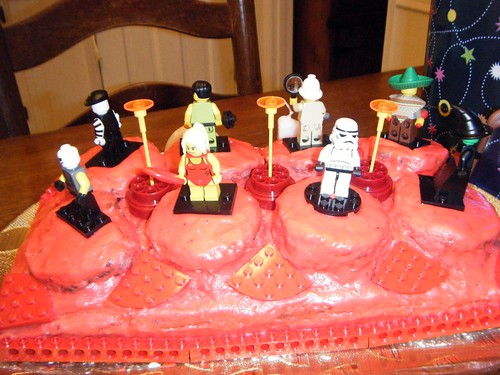
Notice the strategic uses of the quarter round pieces  and center wheels bases to define the circles a bit more.

Lego Birthday Cake 2


The long red pieces disguise some uneven edges and the baywatch babe coordinates well with the frosting.


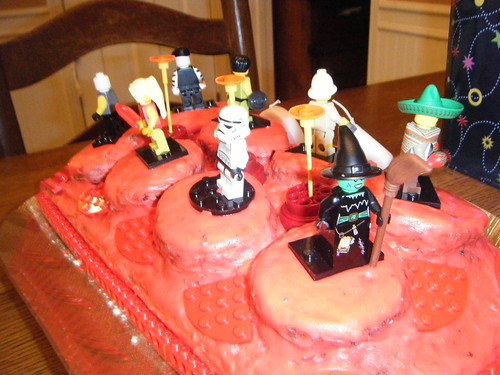
The Mime and the Skull Guy near each other just crack me up.  You'll also see some yellow things sticking up in the center of the cake.  That was more to aggravate The Eldest than anything else.  It drives him nuts that those are some of my favorites pieces to build with.  I put those yellow antennae thingies in almost all my creations.  So of course, it had to be in the cake too! 

I'm here to tell you that there's nothing like making a project really busy in order to hide all your sins!

Paper Mache

Every year at The Eldest's school, the entire school is required to do a media center reading project.  This year The Eldest chose Space as his theme.  They read books about it and then they have to do something creative.  He chose to do a paper-mache model of the space shuttle.   He plans on having a cargo bay with working doors on it.

This isn't going to be a tiny model either.  It's being built to 1/40th the size of the shuttle, so it will be approximately 3 feet long and 2 feet wide.  It's going to take a lot of glue and newspaper I think.

We started brainstorming and sketching and then broke out the newspaper and masking tape to start making the form:

2010_09130016


You can see how large this is going to be when we back up some and look again:


This is as far as he got with it.  He still has to finish the back of the cargo bay and add the back and wings, so it has a way to go before we can start layering the newspaper and glue.  Then we're going to install (somehow) a robotic arm (fake of course, we're not ready to tackle robotics yet) that can hold a model of a piece of the International Space Station.

I'm trying to back off this project as much as possible so that he can do the bulk of the work.  I'm mainly serving as artistic director,extra hands and photographer.  I'll give you an update next week after we tackle the next part of the shuttle. 

Monday, September 13, 2010

Skull Pops!

 Anyone who has been reading my blog for a while knows that two things never go out of style in this house of boys:  Skulls and Flames.  If you have either of those, you're cool for life.  So how could I turn down some awesome silicone skull ice trays I found a few days ago at the Dollar Tree?

 I've been having so much fun brainstorming on how we could use them.  Obviously, the first thing we did was to make ice, but that didn't go over so well.  While he liked the ice, The Youngest became really mad when the skulls melted.  So, on to project #2:

Skull Pops!

What you'll need:

Almond Bark Candy - both white and chocolate
Popsicle sticks
Microwave
Skull Ice Tray

1.  Melt almond bark candy (vanilla) in the microwave according to directions and pour it into one side of the tray:

2010_09130018

 I sprinkled some Cocoa into the trays to help them release and also so that the skull faces would show up better against the white candy.  When I do this again, I'll leave out the cocoa since I wasn't really pleased with how it turned out.  Next, melt the chocolate almond bark candy and pour it into the other side.

2.  Let cool and then pop the skulls out of the tray:

2010_09130022


  2.  Melt a little more of the almond bark and use it as a glue on one of the white skulls and one of the chocolate.  Place a popsicle stick in between them and then stick them together like so:

2010_09130025


Some of my "glue" oozed out of the last one a little, but nobody around here minded in the least, it was just more candy to be consumed.  You can easily wipe the excess away.

3.  Let these cool and then devour:

2010_09130029


You'll notice that there's one missing.  The Youngest grabbed one and ran before I could snap a pic of them all together.

These will be perfect for a Halloween (or for my household a whenever) treat!