Friday, July 24, 2009

Sometimes You Just Get Lucky

Dinner time is always a challenge and never a pleasure in my house. Not one child likes what's on the menu unless the menu is either hot dogs or pasta with white sauce. It's always stressful for me and tonight was no exception. We had Fruit Sauced Chicken Breast and Green Bean Almandine, but this time we ate by candlelight.

Turns out that kids will eat a lot of food in order to blow out candles. Who Knew? For every bite eaten, a candle was blown out. I kept the lighter handy. :)

*********


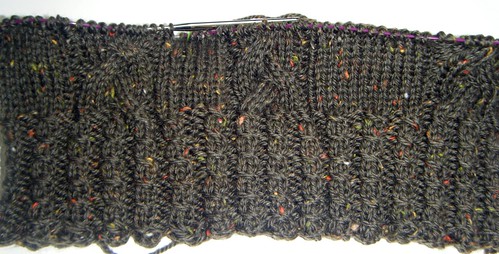
Significant progress is being achieved on the knitting project:


Dark Green Day Vest Progress:


Have a great weekend!

Thursday, July 23, 2009

DIY Fun - Joint Compound & Stencils

Ever wanted to add a little subtle pizzazz to your walls or cabinets for little to no money? Using joint compound and stencils is a great way to do this and I'll show you how to do it on the cheap!

Basic Supplies:

Joint Compound - you can get much smaller size buckets of it than this. This is what I had in the garage already.
Wall or Cabinet Surface
Putty Knife - I couldn't find mine for this tutorial so I grabbed a joint knife instead.
Stencil(s)
Painter's Tape - please don't use masking tape, it will pull up paint from your wall's surface.
Tape Measure
Pencil
Level - optional


Step 1:

Working on a clean dry surface, use a tape measure to accurately pinpoint where the stencil should be placed. For this tutorial I am using a scrap board, so I did not measure anything.

Step 2:

Place stencil on the surface and tape it down with the painter's tape. At this point you may want to use a leveling tool to make sure that your stencil is level and not crooked. I can't tell you how aggravating it is to do all the work of getting a stencil on the wall and then take two steps back and notice that it's crooked and have to start all over.

Step 3:

Load up your putty knife with joint compound.


Step 4:

Lightly and carefully pull the putty knife across the stencil making sure to fill in all the blank spaces. Please don't make a thick layer, it's supposed to be subtle, remember?


Step 5: (do this as soon as step 4 is complete).

Carefully pull the stencil away from the wall.


Step 6:

Using a damp paper towel, gently wipe away any unwanted joint compound that is on the surface. If you are neater than I was and use a putty knife instead, you'll be able to skip this step.


Step 7:

Did you make a mistake and want to start over? No problem, Use a damp paper towel to wipe away the whole thing and start over. Easy!


Step 8:

Step back and marvel at your creation.

The picture below is above my cabinets and right below my ceiling. It is unfinished as of now:


What should you do with it once it's dry?


This is the fun part.

a. If you want a very subtle tone on tone look that will play well with lights and shadows, paint over the piece with the same color that is already painted on the walls or cabinets.

b. Want it to show up a bit more? Antique it with a glaze paint.

c. Want it to really stand out? Paint the work with a contrasting color to the walls or cabinet.

Once my kitchen renovation is complete, I'll be using a combination of both a and b. It will be tone on tone and then very lightly antiqued to make it stand out a bit more on the cabinetry.

Enjoy!

Wednesday, July 22, 2009

Green Day Sweater Vest

Yesterday I mentioned that I'm currently working on the Green Day Sweater Vest by Mari Muinonen. I'm still using the Paton's Classic Tweed Wool in Deep Olive that just didn't want to be the 1930s Sweater. I like it much better in this project.

Here's the progress so far:

I was worried that the flecks of color would detract from the cables, but I don't think that 's happening, do you? If you noticed that the left cable is different than the two right ones, it's because the panel in between the two cables on the left is the center front of the sweater. There are four large cables total on this vest, two right and two left.

There are two mods that I've made so far, only one of which was completely intentional. I added two stitches to the front to make a panel in the center of the sweater. That's the one that I meant to do. The second was on the baby cables at the bottom. I left out a row in the center of the baby cables, unintentionally, but decided that I liked it anyway and continued the mistake throughout the bottom of the vest. To make up for the lost rows, I added another baby cable repeat before starting the body of the sweater.

I had a difficult time figuring out the pattern instructions for doing this in the round. I've figured it out for the body so far, but who knows what will happen when I get to the straps. :)

Tuesday, July 21, 2009

A new project

It seems that today was a day for killing chickens, so to speak. My apology to those of you that actually have chickens. I'm not allowed to have real ones since I live in snob country. Evidently, anyone that owns livestock is considered riffraff around here.

Okay, back to chicken killing, or in other words, errands. School starts back in just two tiny little weeks. Yippee! Shhh, don't tell the kids I said that. But before school can start, supplies must be purchased and medical forms need to be signed off on, and garbage like that. So, I did at least get the form to the doctor. Then there was the dry cleaners, oh, and a birthday gift to be purchased. And last but not least, The Eldest and I got a wild hair and rearranged the living room. Whew!

Obviously, I haven't knit a thing today. But I did start a new project yesterday: The Green Day Sweater Vest by Mari Muinonen. I've seen some amazing things done with this pattern over on Ravelry. So in an effort to regain my knitting mojo, I decided to try it as well. I'm doing this sweater in the round. That way I can try the d*mn thing on to make sure it fits me as I go along. Kinda important in my book since knitting flat has failed me lately. I did get about 1.5 inches done yesterday. I'll hopefully find some time tonight to work on it.

Oh, and just for giggles, here's the Youngest showing his muscles at the beach last week:

Monday, July 20, 2009

Do you ever feel that you waste time while knitting? If you are a process knitter, the immediate answer is no. But a product knitter, like me? That would be an unequivocal, yes. Especially when things don't go as planned, like this past week, on my vacation. Maybe I've lost my knitting mojo. Perhaps my Knitter-fu has deserted me, I'm not sure.

I really wanted to make the 1930's sweater, but it just wasn't meant to be. It ended up being about 2 to 3 inches too short, and that's even with me adding two inches to the sweater above what the pattern called for. Then, to top it off, the arm holes were hellishly tight and uncomfortable once the sleeves were set in.

So. I had actually finished the sweater, but now it now looks like this:

Again.

Vacation was wonderful. We went to Port St. Joe, FL. This was exactly the kind of vacation that I had envisioned. We practically had our own private beach and pool the entire time. In the entire complex, we saw a sum total of twelve cars and a third of those were local residents.

The boys enjoyed the trip down:
Ring pops are great for trips!


Built a few sandcastles:
No one on the beach but us!

According to the Youngest, we saw a pirate ship:


I was accused of not being in any of the pics, so I might have made a really bad self portrait:
Please ignore the no makeup, beach hair and cheap sunglasses look! (No, I'm not vain, why do you ask?)

And we stayed in a super cute cottage:
Second from the right

On the whole, everything was great except the knitting. Can't wait to go back. Want to go NOW. I'm not the only one: The Youngest keeps asking to go back to the cottage, but it comes out as "I wanna go back to college!"