Yesterday was a good day for waterproof mascara. We had to have our dog put down. She was ancient (18 years to be exact) and just couldn't make it any further. She had developed a tumor in her sinuses, gone blind and deaf and finally lost her sense of smell. There were other issues as well, poor thing.
Cessna had a good long life and we got to spend 14 of those 18 years with her.
Wednesday, February 16, 2011
Monday, February 14, 2011
The Birthday Party
The birthday party was a huge success. The kids all had a fun time and took home lots of loot and the play room was completely trashed. My kids weren't real thrilled about the play room since it's their responsibility to keep it cleaned up, but they got over it.
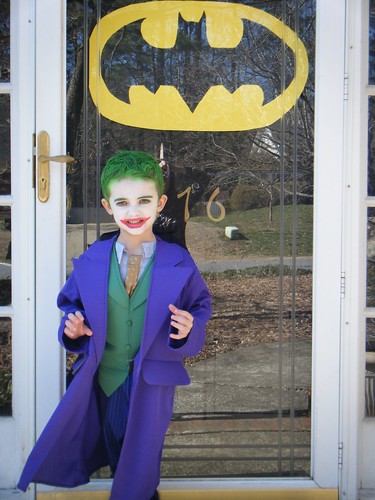
Since our house number is a little difficult to see, I made a huge bat symbol to put on the front door so everybody would know what house was having the party and it worked like a charm. Every kid was yelling at their Mom while in the car "Look at his front door!" I took a piece of yellow posterboard and used a projector to get the bat symbol onto it and then painted it in with black craft paint. Very easy. It's now on his wall above his bed.
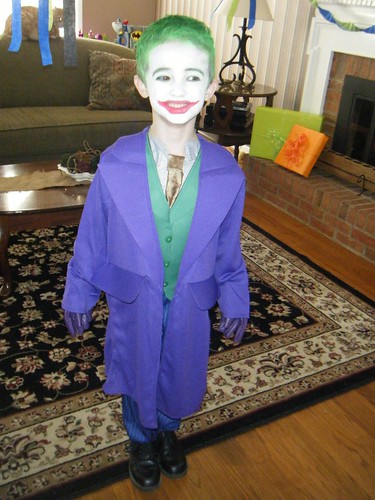
We had face painting for the kids, but only two took us up on it. One had a bat and the other kid (who belonged to me) went as the Joker:
The house was filled with blue, green and black crepe paper streamers as well as the same color balloons. We also made some bats before hand for a game that the kids played. We taped them to the kids' backs and they had a game of tag where they had to chase each other (in the house - total chaos) and see how many bats they could collect.
I also had all the kids "capture" The Joker by putting him into a chair and wrapping him up with rolls of toilet paper. In order to get his presents he had to "escape" from his bonds. He loved that part.
The only other game we had was one called "Stomp the Bad Guy". We filled balloons with candy, blew them up and drew stuff to represent the bad guys on them with a sharpie marker. For the Joker we wrote "Ha Ha Ha". The Penguin had an umbrella, Catwoman a cat and the Riddler had question marks. There were two balloons for each kid to pop. One little girl was so tiny that she had to get a pair of scissors to pop her balloon. She just didn't have the weight to do it. It was very cute.
The capes that I made were also a big hit and they wore them for most of the party and were really excited that they got to take them home. They took the bats from the tag game home as well.
The little guy had this smile on his face the entire day, long after the kids went home. I call that a big success!
Since our house number is a little difficult to see, I made a huge bat symbol to put on the front door so everybody would know what house was having the party and it worked like a charm. Every kid was yelling at their Mom while in the car "Look at his front door!" I took a piece of yellow posterboard and used a projector to get the bat symbol onto it and then painted it in with black craft paint. Very easy. It's now on his wall above his bed.
We had face painting for the kids, but only two took us up on it. One had a bat and the other kid (who belonged to me) went as the Joker:
This is his action pose
The house was filled with blue, green and black crepe paper streamers as well as the same color balloons. We also made some bats before hand for a game that the kids played. We taped them to the kids' backs and they had a game of tag where they had to chase each other (in the house - total chaos) and see how many bats they could collect.
I also had all the kids "capture" The Joker by putting him into a chair and wrapping him up with rolls of toilet paper. In order to get his presents he had to "escape" from his bonds. He loved that part.
The only other game we had was one called "Stomp the Bad Guy". We filled balloons with candy, blew them up and drew stuff to represent the bad guys on them with a sharpie marker. For the Joker we wrote "Ha Ha Ha". The Penguin had an umbrella, Catwoman a cat and the Riddler had question marks. There were two balloons for each kid to pop. One little girl was so tiny that she had to get a pair of scissors to pop her balloon. She just didn't have the weight to do it. It was very cute.
The capes that I made were also a big hit and they wore them for most of the party and were really excited that they got to take them home. They took the bats from the tag game home as well.
The little guy had this smile on his face the entire day, long after the kids went home. I call that a big success!
Friday, February 11, 2011
Batman Birthday Cake
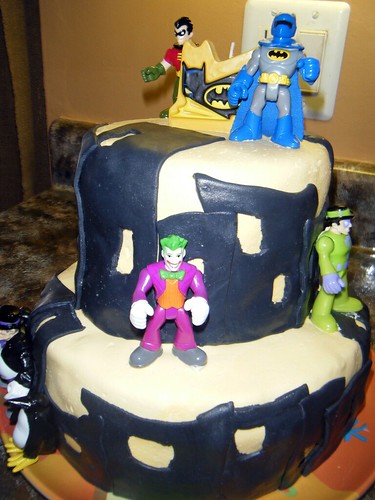
Before tomorrow's birthday party, let me introduce you to the official Batman Cake (please ignore the outlet in the background):
It's made from Marshmallow Fondant frosting and it was way easier to do than I expected (the cake, not the fondant. I've made that before.) For a great tutorial on how to make the fondant go here. I added yellow food coloring, Wilson's Paste, to the fondant as it was mixing. As long as you use a ton of vegetable shortening all over your counters and rolling pin, this fondant is really easy to work with. Clean up's a real pain, but I'll take that. Once I used all the yellow I needed, I added the black to the mix using my Kitchenaid Mixer.
I decided to go with a yellow cake and black cityscape. When it came time to do the buildings, I cut out squares for windows to let the yellow show through. I also let all the buildings be way off kilter for an authentic cartoon look to Gotham City. Have you ever really studied buildings in cartoons? They are never straight up and down. Go watch a Looney Tunes cartoon sometime and you'll see what I mean. Every single window, doorway and building is skewed.
If your background frosting, in this case yellow, is not perfect, don't try to make it so. You'll be layering on tons of buildings and it hides imperfections like a dream. I did the layering one building at a time and put windows in where the yellow was perfect.
The candle on the cake came from Party City and the figures are all Batman Imaginext toys
that my son already had.
I'm thrilled with how this turned out!
It's made from Marshmallow Fondant frosting and it was way easier to do than I expected (the cake, not the fondant. I've made that before.) For a great tutorial on how to make the fondant go here. I added yellow food coloring, Wilson's Paste, to the fondant as it was mixing. As long as you use a ton of vegetable shortening all over your counters and rolling pin, this fondant is really easy to work with. Clean up's a real pain, but I'll take that. Once I used all the yellow I needed, I added the black to the mix using my Kitchenaid Mixer.
I decided to go with a yellow cake and black cityscape. When it came time to do the buildings, I cut out squares for windows to let the yellow show through. I also let all the buildings be way off kilter for an authentic cartoon look to Gotham City. Have you ever really studied buildings in cartoons? They are never straight up and down. Go watch a Looney Tunes cartoon sometime and you'll see what I mean. Every single window, doorway and building is skewed.
If your background frosting, in this case yellow, is not perfect, don't try to make it so. You'll be layering on tons of buildings and it hides imperfections like a dream. I did the layering one building at a time and put windows in where the yellow was perfect.
The candle on the cake came from Party City and the figures are all Batman Imaginext toys
I'm thrilled with how this turned out!
Thursday, February 10, 2011
Let's Make A Super Cape!
So say you have a Super Hero party for your child (ours is coming up this Saturday.) Could be Batman, Superman, etc. And suppose you need a cape for the Super Hero. Oh, and one for each of the guest heros that will be attending the party. Should you shell out a bunch of cash and buy them pre-made. NO! I'll show you a way to make a Super Cape (or 20) and do it for pennies. Sound good? Let's get started.
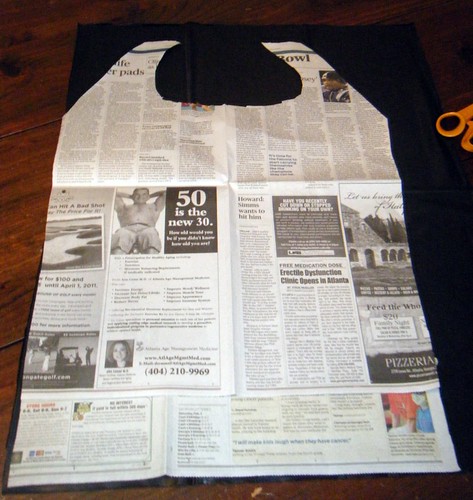
1. The first step is to make a template of your cape. Grab some newspaper. I would also recommend a child to hold it up against, but that's strictly optional. :)
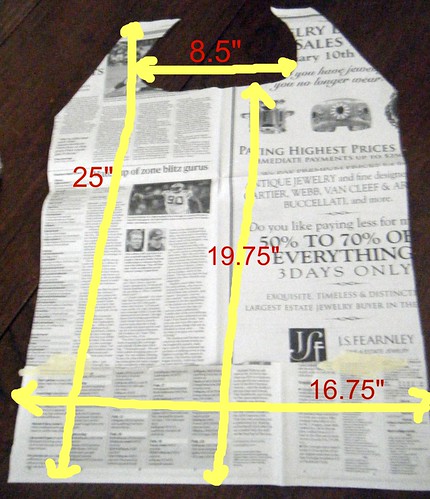
These are the (very crudely drawn) measurements of the ones that I made. This was to fit a five year old boy. I know for a fact that there will be a tiny little girl at the party that this will probably hang on and I'll need to make some adjustments to it for her. Like I said, if you have a child in front of you that you can measure against, it would be really helpful.
I wanted to have the cape fall just below the rear end of the child and not be skimming the floor. This is for a Super Hero, not Darth Vader. If you plan on making a Vader cape, plan to make it twice as long.
Notice that the outsides at the collar edge are angled in. If you do not cut those angles, the cape will not drape right and it will sit all wonky at the shoulders.
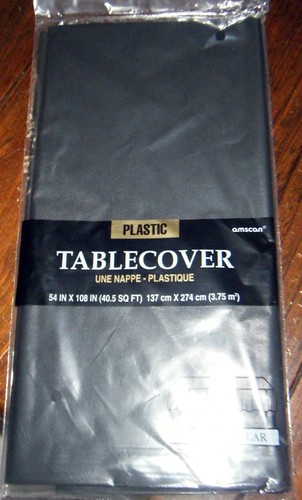
2. The Material. This is where you save the pennies when making this for multiple children. I did not use fabric. Fabric can get really pricey and I just don't have the money right now to shell out that much for this many capes. The next best thing? Plastic Tablecovers! You can find these at Party City or at your local dollar store. I've made all sorts of costume pieces for the stage for children out of this material and it will save you a ton of money.
4. Cut to the pattern. When you lay your newspaper pattern on each piece of the tablecover that you have cut, save yourself some cutting time by moving the pattern all the way to corner at the bottom. This way you have two less sides to cut.
5. Cut the fabric out. Then the finishing touches are added. You can add some Sticky Back Velcro, shown below, to the points at the collar to hold it on. In the case of Batman, points were cut out at the bottom of the cape to give it that bat-like effect.
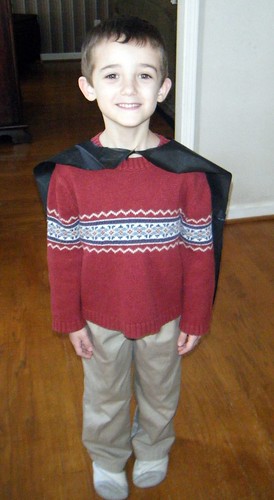
6. Try It On!
1. The first step is to make a template of your cape. Grab some newspaper. I would also recommend a child to hold it up against, but that's strictly optional. :)
These are the (very crudely drawn) measurements of the ones that I made. This was to fit a five year old boy. I know for a fact that there will be a tiny little girl at the party that this will probably hang on and I'll need to make some adjustments to it for her. Like I said, if you have a child in front of you that you can measure against, it would be really helpful.
I wanted to have the cape fall just below the rear end of the child and not be skimming the floor. This is for a Super Hero, not Darth Vader. If you plan on making a Vader cape, plan to make it twice as long.
Notice that the outsides at the collar edge are angled in. If you do not cut those angles, the cape will not drape right and it will sit all wonky at the shoulders.
2. The Material. This is where you save the pennies when making this for multiple children. I did not use fabric. Fabric can get really pricey and I just don't have the money right now to shell out that much for this many capes. The next best thing? Plastic Tablecovers! You can find these at Party City or at your local dollar store. I've made all sorts of costume pieces for the stage for children out of this material and it will save you a ton of money.
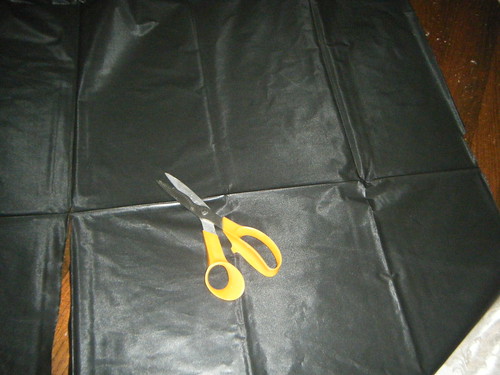
3. The horizontal fold that you see going through the center is the main center fold. I cut along the center fold and then every three rectangles to get the measurements seen above. Use your individual child's measurements to make sure that you have the width and length that you need. The factory folds just made this project easy for me to measure by. With the 54" x 108" table cover, I got enough "fabric" to make 10 capes. I purchased two tablecovers to get my 20.
4. Cut to the pattern. When you lay your newspaper pattern on each piece of the tablecover that you have cut, save yourself some cutting time by moving the pattern all the way to corner at the bottom. This way you have two less sides to cut.
5. Cut the fabric out. Then the finishing touches are added. You can add some Sticky Back Velcro, shown below, to the points at the collar to hold it on. In the case of Batman, points were cut out at the bottom of the cape to give it that bat-like effect.
6. Try It On!
BackView
Front View:
So what was the final cost per cape? I spent $1.99 for each tablecover totaling $4.00. Divide that by 20 and it comes out to just 20 cents per child! Not too shabby huh?
Tuesday, February 08, 2011
Thrift Store Fun
I went thrift shopping this weekend and was a woman on a mission. See I have this seating problem at my place. If I'm not in the living room and want a chair to relax in, the only options up til now have been a kitchen chair or my office chair. Now, I love my office chair. It's super comfy and I spend most of my day there. However, sometimes a gal needs a chair of her own and I wanted mine in the bedroom.
I did have a rocking chair in there. An old wooden one that was great for rocking babies, but it was not so kind on the rear end. It mostly held clothing that the husband just threw on it. Most people use a treadmill for draping clothes, he used the rocking chair. I have no clue what we're going to do with the chair now. We don't have room for it and it won't fit in the attic.
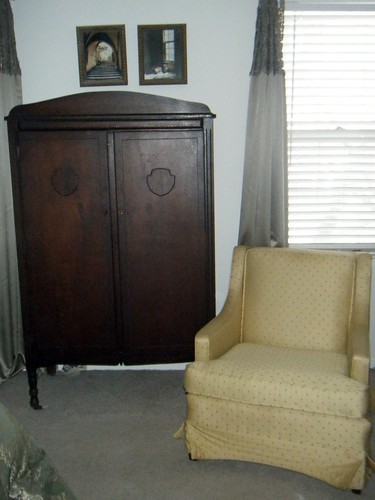
Anyway, we (my Mom and I) went shopping. The first place we hit (Goodwill), we struck gold. I found a small chair that had great high quality upholstery fabric and was super comfy. Best of all, it was only $25 bucks. Can't beat that with a stick, can ya? It needs cleaning and a little bit of tlc, but other than that, it's perfect.
Welcome to my bedroom (I just realized that I've never shown you it before):
Mama's happy now. One comfy chair in the bedroom that didn't break the bank. Very cool.
I did have a rocking chair in there. An old wooden one that was great for rocking babies, but it was not so kind on the rear end. It mostly held clothing that the husband just threw on it. Most people use a treadmill for draping clothes, he used the rocking chair. I have no clue what we're going to do with the chair now. We don't have room for it and it won't fit in the attic.
Anyway, we (my Mom and I) went shopping. The first place we hit (Goodwill), we struck gold. I found a small chair that had great high quality upholstery fabric and was super comfy. Best of all, it was only $25 bucks. Can't beat that with a stick, can ya? It needs cleaning and a little bit of tlc, but other than that, it's perfect.
Welcome to my bedroom (I just realized that I've never shown you it before):
The color is perfect too. There's gold in my comforter (you can see a piece of it in the bottom right of the pic) and the brown dots on the chair are the same color as my drapes and the same brown is in my comforter also. It's parked next to my grandmother's chifferobe. What you can't see in the pic is a book shelf off to the right. One shelf is just the perfect height for holding a cup of tea while relaxing in the chair.
The tlc needed is at the bottom of the chair. The little flaps that cover the legs look like they're going to take flight. I'm planning on steam cleaning the upholstery and then sewing the flaps down properly so that the chair doesn't try and fly away.
Mama's happy now. One comfy chair in the bedroom that didn't break the bank. Very cool.
Monday, February 07, 2011
Life's little lessons are hard, aren't they?
The Pinewood Derby was successful, except for the child that got sulky because he didn't have the fastest car and he received no special recognition for what he thought was a spectacular car. That would be The Eldest of course. Life's little lessons are hard, aren't they? He'll learn sooner or later.
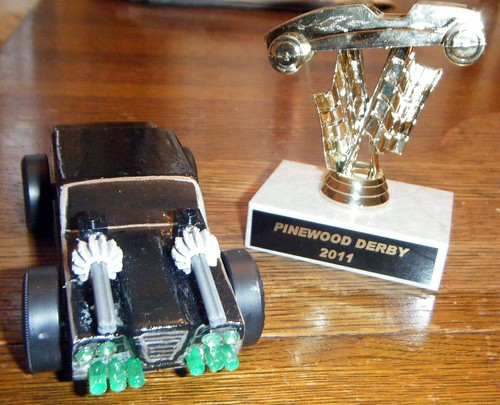
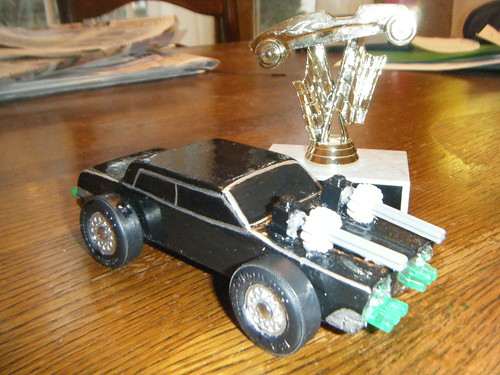
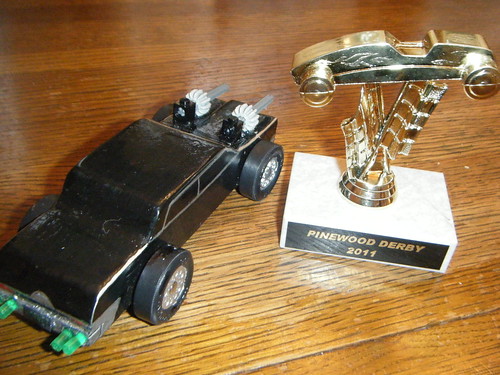
I finally got the official pics of the car with the wheels on it:
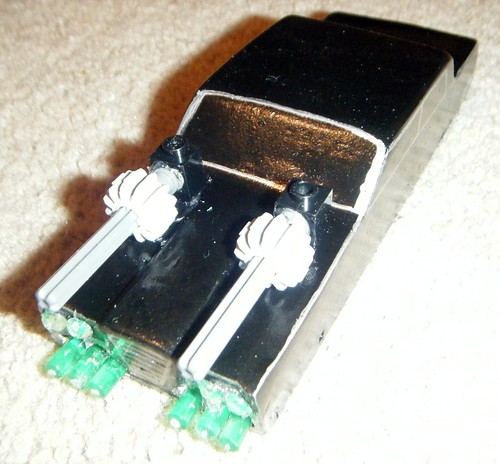
From the front:
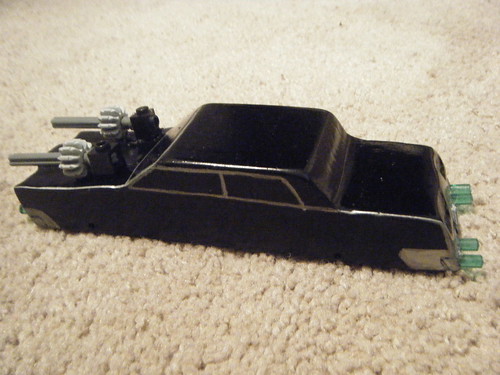
The guns on the hood were made from Legos that were hot glued on to the car. All chrome was done with a silver Sharpie marker. Headlights were glued on green jewels. Rockets were created from dollhouse torches that were sawed off and glued into pre-drilled holes.
Side View:
Back View:
The Hornet license plate was taken from a pic found online. I put it into Word and shrunk it down then printed it out.
The entire car had a really thick clear coat put on it as well. I would not recommend doing this in a freezing garage though. The clear coat (first one) ended up creating a crackle finish all over the car. Now, I don't know about you, but I don't think the mega wealthy green hornet would have that bad of a paint job on his car. So, I sanded it off, repainted the black, re-did the silver and then clear coated it (indoors this time) again. Basically, we did all the paint stuff twice. I won't be doing that again! Life's little lessons are hard, aren't they?
Thursday, February 03, 2011
First Look at the Green Hornet Pinewood Derby Car
Pinewood Derby Season for the Cub Scouts has arrived again. The Eldest decided this year that he wanted The Black Beauty car from The Green Hornet.
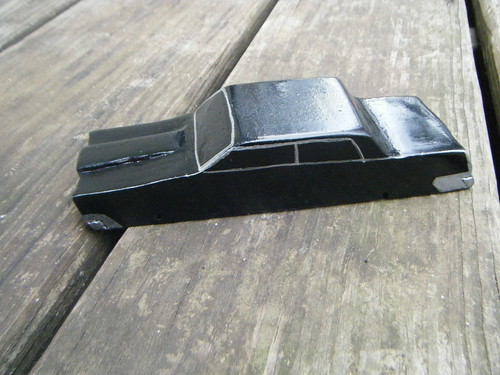
I think the toughest part of this car this year was getting the general shape of the car. There has been much sanding and dremelling going on around here. I could kick myself for not getting a pic of the car before painting it, but oh well.
Here's what it looked like after it had been painted black and had Silver Sharpie "Chrome" drawn on it:
The Eldest also wanted guns coming out of the hood like in the movie, so we raided our box of legos to get these and mounted them with hot glue:
Don't these all look great used together?
The car is currently getting a clear coat of paint to seal everything and then it will get it's wheels. I'll show you the final version when it's finished.
I think the toughest part of this car this year was getting the general shape of the car. There has been much sanding and dremelling going on around here. I could kick myself for not getting a pic of the car before painting it, but oh well.
Here's what it looked like after it had been painted black and had Silver Sharpie "Chrome" drawn on it:
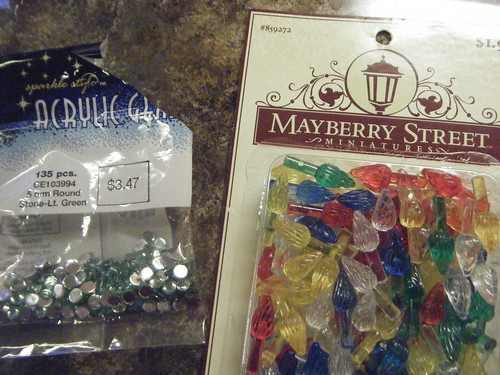
The next step involved taking a trip to Hobby Lobby and trying to get my son to stay out of the pinewood derby section for what we needed. He's a very straight forward child and to him, if it's not in that section, then you can't use it. Not a problem.
The first section that I made him go to was the doll house section. Boy did he not want to do that. That's girl stuff! But he started listening really quick once I told him my vision. I had found some plastic translucent torches that were perfect for making green rockets. We ultimately had to cut off the fat part of the torch and just use the stem in order to get the correct look. Worked perfectly. Then I pulled him into the jewelry making section to grab some glue on jewels to make headlights.
Here's a pic of the materials:
The Eldest also wanted guns coming out of the hood like in the movie, so we raided our box of legos to get these and mounted them with hot glue:
Don't these all look great used together?
The car is currently getting a clear coat of paint to seal everything and then it will get it's wheels. I'll show you the final version when it's finished.
Monday, January 31, 2011
Paint Weekend
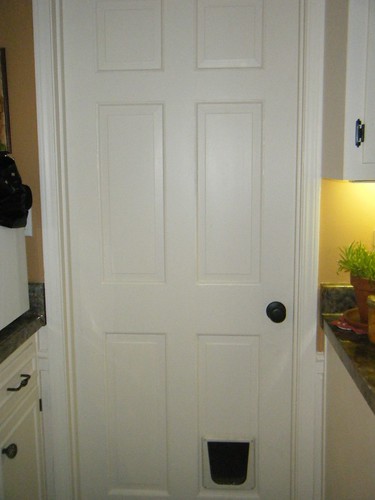
I spent my weekend painting doors and cabinets. I was feeling good enough to tackle a paint brush, so I got to painting. It was nice to finally get the doors to my kitchen completely finished (and with new hardware even.)
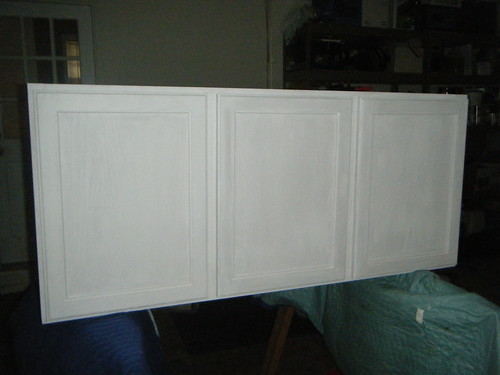
I know how exciting it is looking at a door, so I won't show you the other, it would be just too much excitement for this blog. So how about a primered cabinet?
Oh yeah. Now that's excitement. I'm going to paint this cabinet the color of the walls in my laundry room instead of the contrasting color so that they blend in rather than stick out. I don't want these cabinets as noticeable. I will get some fun knobs for them though. :)
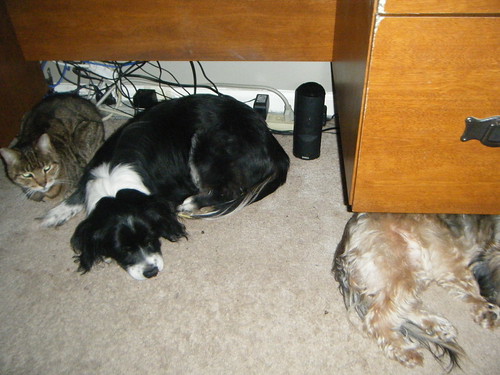
All this painting was just too much for these guys:
How many animals can you fit under your desk? Would someone please tell me why these animals congregate where my feet are supposed to go? And while your at it, would someone please go under there and pick up the speaker that fell off the back of my desk this morning? Thanks.
I know how exciting it is looking at a door, so I won't show you the other, it would be just too much excitement for this blog. So how about a primered cabinet?
Oh yeah. Now that's excitement. I'm going to paint this cabinet the color of the walls in my laundry room instead of the contrasting color so that they blend in rather than stick out. I don't want these cabinets as noticeable. I will get some fun knobs for them though. :)
All this painting was just too much for these guys:
Wednesday, January 26, 2011
Multi Tasking at the Fine Arts Show
Last night we were required to attend the school fine arts show. It was awesome knitting time. I got a lot of odd looks, but it was so worth it. I will say that it's a good thing that I need very little light to knit though. The biggest problem was being able to see to mark my pattern in order to keep up with which row I was on.
I was fussed at a little by one person and that was the five year old that I brought with me. "Mom, you're supposed to be watching!" Well, I was watching and listening. I'm multi-talented that way. After all, God made Moms to be multi-taskers and that's what I was doing. I watched my Eldest sing and then had to sit through the rest of the grades do their thing while clicking away with my needles.
This is the progress that I made on the second side:
It's gotten so that I can't sit down and not be doing something these days. I get all fidgety and feel like I'm not being productive. Knitting fulfills a very valuable niche in my life that way. It's a portable, practical hobby that's relaxing and productive. What's not to like about that?
Anyway, I feel like I'm making good progress on this sweater. Just a little more time and I'll be finished with the body and will be able to get cracking on the sleeves. I do wish that I had converted this to be done in the round though so that I could try it on as I go, but oh well.
Thursday, January 20, 2011
Where did my life go?
I feel like I'm floating in someone else's life lately. Is there crafting being done? not really. Knitting? a bit DIY? not really. Where did my life go?
I'm still not well and have been spending much of my days resting which totally sucks since that's not what I want to be doing. I went from being the Energizer Bunny to being a Couch Potato. It has been good for having time to spend at online gaming though, but how does that make my house look beautiful? It doesn't and my hips are starting to show the effects too.
You know how when you're sick and lose your appetite and you lose all that awesome weight? (I'm talking the 5 - 10 lb kind of weight, not serious unhealthy weight) Well, my appetite showed back up and I gained it all back and that's just depressing. During the holidays, that weight loss was my only rainbow coming out of the black cloud following me. Oh well. I'm doing really well at gaming though. :)
So if things have been sparse and sporadic with the blog, please bear with me. I'm trying to get the docs to work with me and listen to what is actually going on and it's not happening so far and that's totally taking up all of my time that's not being spent on my family. I keep thinking up all these neat projects that I want to do and share and just don't have the time and energy to spare for them yet.
They'll be coming soon though. There's a Batman/Joker party in the works and Mama's got to come up with some good stuff for it pronto!
Wednesday, January 19, 2011
Who's Coming to Town?
You know Christmas still has a pull on a kid when you hear from another room:
"You watch out; You better not cry
Better not pout; I'm telling you why
Spiderman is coming to town..."
"You watch out; You better not cry
Better not pout; I'm telling you why
Spiderman is coming to town..."
Monday, January 17, 2011
First Piece of Mystere
Mystere is now 40% complete. That's fancy talk for the front (or the back since they're both the same) is done.
It's also been blocked within an inch of it's life. I don't know if it was the yarn or what, but my confidence in this piece was less than great. So, I decided to get out the schematics of the pattern and block this to make sure everything was like it should be. I should have trusted myself more I guess. The piece was dead on with the schematics. Yay!
This has been fairly fun to knit. I love how subtle the cable is in the front and the texture that surrounds it. There's garter stitch at the bottom edge, reverse stockinette at the sides and the cable panel in the middle. I also like the waist shaping that is happening in the piece as well. This has been great for moving watching due to it's simplicity.
The one thing that I'm not liking is the yarn. The yarn (Nashua Hand Knits Creative Focus Worsted) is a lofty, single ply mix of alpaca and wool. The ball band says it's a 10 ply, but if that's a 10 ply yarn, then I'm a jack rabbit. It's looks like it is softer than it really is and it's very fuzzy. I don't mind that part, but what I do mind is the splittiness of the yarn.
It's very easy to only grab part of the loop your working with and not notice until the next row. When this happens it's very noticeable. I've just been grabbing the stray loops and pulling them up onto the needle with the loop above it and working them together and that seems to be doing fine, but it's still a bit messy looking. However, I'm not ripping back every time I find one. I'd never get this sweater finished if I did that! It happens pretty much every two rows. Yuck. I won't be purchasing this yarn again.
Thursday, January 13, 2011
Everything's Coming Up Roses!
I was flipping through the Grandin Road Catalog the other day and came across this:
This is a snapshot of some really pretty pillows and area rugs (link to the catalog page) that I fell in love with. It caused all sorts of WANT in me and I'm determined to make something similar. More for the "I can make that!" side of me that rears it's ugly head every now and then than for any other logical reason.
So I did a little research in how to make Crocheted Roses and found a Leisure Arts free project (the link is to the pdf) that was written by Terry Kimbrough who is a crochet genious. These roses are so lovely and easy to make. Just two rows of crochet will make one rose. If you combine some Noro silk garden yarn and this pattern you get some jaw dropping gorgeousness:
Just look a little closer at one of the roses:
I'm planning on making some solid color roses to go along with these for the pillows that I will make. I'm going to have to come up with another skein or two of Noro silk garden before the project is done if I want two pillows worth though.
Aren't they pretty?
Wednesday, January 12, 2011
The Novelty Is Over
The Novelty of the snow is over and the pain of the ice has set in. The kids and I are working through some severe cabin fever.
So in order to alleviate it just a bit, the Youngest and I decided to make some aliens. Here's our first batch:
Cute aren't they? Super easy to make too.
We use stiff felt for the feet and cut it into a fat V shape. Added a dab of glue and placed a pom pom on it and then attached two googly eyes to it. Easy Peasy.
So easy in fact, we may be up to our ears in little aliens soon...
Monday, January 10, 2011
Snow!
We got hit with another snow storm last night and got between 5" and 6" of snow. Way more than we are used to here in these parts. The kids are loving it!
This was the first thing they did this morning:
Just look at the expression on this kids' face:
You don't get much happier than that!
This was the first thing they did this morning:
Just look at the expression on this kids' face:
You don't get much happier than that!
Tuesday, January 04, 2011
Much Happier Yarn
Before I get into all things yarny today, I just wanted to say thank you. Thank you for the support and encouragement that you've given me over the last two horrible months. I can't tell you how much all your comments have meant to me. Even though I responded to very few, please know that they were a very welcome part of my days.
Okay, on to all things yarny. Remember the snobby yarn from yesterday? It's gotten over it's hoity-toity ways and has now settled into a much happier lifestyle.
I chose to make Mystere by Cecily Glowik Macdonald. There are still cables in this pattern, but they are incredibly subtle ones. You can just see one in the center of the project above. These aren't the tight kind of cables, but loose and flowing. The little you see above is the beginning of the back of the sweater that I did this morning while re-watching the movie Twilight. Doesn't look like much yet, does it?
There is also lots and lots of reverse stockinette, but instead of making this a dreary pattern, it's keeping it fairly lively. It's very simple (which this yarn was craving) and full of lots of texture. I'm pretty stoked about it and I think it's just what the doctor ordered this time around. Something simple, quick and still has cables. Yes!
Monday, January 03, 2011
Loose Yarn
I started a new project the other night. One that I really like, but I'm afraid that the yarn that I chose has decided that it's just too good for the project. Snobby yarn. It's too loose and fancy free for a multi-cabled project I'm afraid. The stitch definition just isn't there. I also got gauge, but it feels way too loose and limber.
This is what it looks like currently:
.
The cables just aren't defined enough and the fabric feels loosey-goosey (that's a technical term.) I got through 32 rows of the front right side and decided that it just wasn't doing it for me. I adore the pattern (Ravelry link), but not with this yarn.
Not wanting to give up on the snobby yarn, I went looking through the Ravelry database in search of just the right pattern for it. Ya know what? I didn't find one single thing that thrilled me. So many bloomin' patterns there and not one raised it's hand and spoke up for the yarn. So sad.
As soon as I hit the publish post button here, I'm heading back to Ravelry to go through the patterns some more. Maybe I wasn't in just the right mood last night or was looking at overly complicated projects. This yarn wants simplicity I'm thinking. We'll see.
Two others in the house weren't bothered a bit by my frustration last night (the traitors):
Friday, December 31, 2010
5th Birthday!
Five years ago today I was a happy camper. Finally no longer carrying around an alien in your stomach leads to a very happy mama for sure!
Today is The Youngest's Fifth Birthday and it's been a fun one. We are not having the official party until either the end of January or February. It's just too close to the holidays. But he's had a ball today anyway.
In October I put in a shopping moratorium for the boys. No spending on themselves whatsoever until after Christmas. The purpose was twofold: A) So they wouldn't buy what was already bought for them as presents and B) So that they would save up their allowances and supplement what they did get for Christmas. So today, the moratorium went away and they knew down to the penny what they had in their wallets.
The Youngest bought himself a Spiderman/Green Goblin/Venom action figure set with his $20 that he had saved and he's thrilled with it. He got this after he had already opened his gifts from us. To him, it's like a second Christmas already and his Aunt will be bringing another set of gifts over this evening. His brother managed to buy five different Wii games for the new Wii they got this Christmas (which I got for free from Swagbucks by the way - Still happy about that one!)
Oh, and the Youngest got to eat Coconut Cake for breakfast too. He's thinking that he's had a Pretty Alright Birthday! Cake, presents, shopping... I think I might have to agree. Sounds fun to me too.
Wednesday, December 29, 2010
Catching up after another trip (yes, another) to the ER
For the past two weeks or more I had been having these pains and the only thing that helped was laying down. On Christmas night I was having severe chest pains and thought I was having a heart attack. So there was yet another trip to the ER for me during Christmas, but this time it was a good thing.
I had my parents (while it was snowing profusely) drive me to the ER in their Podunk little town. I'm not exaggerating the podunkness here of the town even a little bit. There's not one red light, just one tiny four way stop. If you blink, you've missed the town completely. The teensy tiny hospital has traveling doctors that visit it and I got lucky this night by getting someone who knew what he was talking about.
Over the past month I've had two EKG's done, one Echo Cardiogram done and seen lots of docs who were hesitant about doing anything. It turns out that the traveling doc knew what he was talking about and wasn't afraid to say it.
The chest pains were from an inflammation in the chest wall surrounding the ribs. Every time that I would cough, breath or have an irregular heart beat (more about that in a minute), it would hit that inflammation and be excrutiatingly painful. The cause? Remember the virus that turned into a sinus infection at Thanksgiving? That was the culprit. He put me on a methylprednisolone pak and some ibuprofen it's helping already.
Now, for the irregular heartbeat, he suspects mitral valve prolapse (which I evidently inherited from my Dad.) So that will be the next thing that I have looked at by my fancy docs.
Long story short, I'm feeling better (YEA!) and I am finally able to get up and move around somewhat. A good thing, cause the three males in the household have let things pile up into an ungodly mess. I've started chipping away at the Christmas toy mountain, Laundry mountain and the rest of the stuff that's been piling up on every flat surface. I'm afraid it's going to take a while to catch back up. :)
Friday, December 24, 2010
Merry Christmas Eve!
Merry Christmas Eve everyone!
I managed to finish my project, get it blocked and photographed! Yippee! I'm pretty sure it's safe to share it with you. The recipient is off from work and that's where she usually checks the blog. Plus, she'll have it in two hours anyway, so I'm going to show you how it turned out.
From the front:
And hey look! It's the Millennium Falcon!
This is the Kathy Kelly Cabled Capelet by Renate Haeckler and it can be found for free here. (Ravelry Link)
Mods:
Instead of doing the 3 in 1K (I didn’t like the way mine was turning out), I changed it to M1, K, M1. I like the division between the panels much better this way and it adds the feel of lace in between the pretty cables.
So, the big project is done and now I can enjoy my Christmas. Hope you have a wonderful one!
Merry Christmas Everyone!
I managed to finish my project, get it blocked and photographed! Yippee! I'm pretty sure it's safe to share it with you. The recipient is off from work and that's where she usually checks the blog. Plus, she'll have it in two hours anyway, so I'm going to show you how it turned out.
From the front:
From the back:
And hey look! It's the Millennium Falcon!
This is the Kathy Kelly Cabled Capelet by Renate Haeckler and it can be found for free here. (Ravelry Link)
Mods:
Instead of doing the 3 in 1K (I didn’t like the way mine was turning out), I changed it to M1, K, M1. I like the division between the panels much better this way and it adds the feel of lace in between the pretty cables.
So, the big project is done and now I can enjoy my Christmas. Hope you have a wonderful one!
Merry Christmas Everyone!
Subscribe to:
Posts (Atom)