Showing posts with label decor. Show all posts

Wednesday, September 01, 2010

A Use for Peach Pits

Remember my last trip to the dollar store?    Well, I went back and found a few other gems.

More glassware that will be transformed into smaller versions of the hurricane lamps:

2010_09010012

Also, gearing up for Fall, I found these lovely darlings:

2010_09010007


Speaking of the William Sonoma Hurricane Knockoffs, I finally found something to put in them:

2010_09010014


Peach Pits!  Two summers ago, we had a bumper crop of peaches from our peach tree in the back yard.  I spent quite a bit of time scrubbing the pits and drying them out.  I wasn't sure what I was going to be using them for, but I loved the color and texture that they had.  They'll add a lot to the Fall mantlescape.

Just look at all that texture:

2010_09010016


Also, look at what a difference a change of lighting makes.  Who knew peach pits could be interesting?

Thursday, January 07, 2010

Mirror Followup

Yesterday I showed you my Mirror DIY project where I painted the two mirrors with some Krylon Metallic Paint in Oil Rubbed Bronze.  Today I wanted to show you the big mirror on the mantle and the mantle itself.

Every year after I take down all the Christmas decorations I get all depressed.  The house looks so bare and so does the mantle.  I usually just go with a spare look, such as just a few candlesticks on each side and maybe one thing in the middle, but not this year.  This year I wanted something busy, but it had to include many shades of brown, a few other natural colors and have lots of texture.

Here's how it's turned out so far.  Bear in mind that this is a work in progress and that I'm still tweaking it:


I've had a devil of a time photographing this mantle.  The pictures just don't do it justice and neither does my camera.  So here's a couple of other angles:


All three of these are blurry. One day I'll get a real grown up DSLR camera.

For a breakdown of what's on the mantle:


This is to the left of the mantle.  The tall wooden puppet is from Indonesia and really works.  The brown teapot was brought back by my husband from a trip to Peru and the box it's sitting on was a gift from my brother's trip to the Czech Republic.


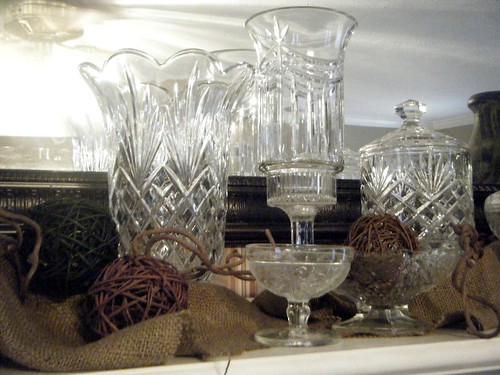
In the center is a small collection of cut crystal.  Some were wedding gifts, some belonged to my grandparents and a couple were also brought back by my brother from the Czech Republic.


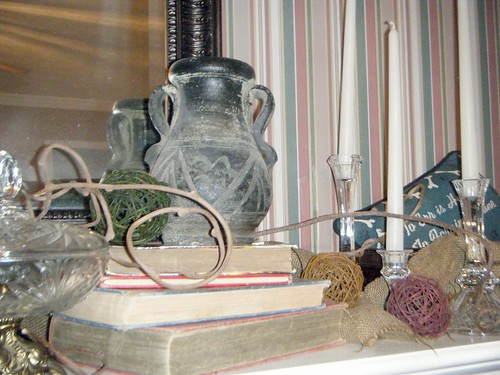
And to the right, I found some old books that has been tucked away and stacked them with their edges out to display the different shades of tan and brown.  These also served to give some height to display the black pottery.  Oh, and there's a green pillow tucked into a small metal basket on the right.

To pull everything together I grabbed some strips of burlap that was leftover from the kitchen curtain project and bunched it up a little and then spread it across the mantle.  I made sure to give it some height in some places to add interest.  Next I grabbed some dried curly grape vines that were originally in my foyer in a large pottery jug and stuck it in random places.  I also have some little vine balls on the mantle that have been dyed that I purchased at Target.  I used these as filler.

Also please keep in mind that the nasty striped wall paper will also be disappearing over the next couple of months. My "MantleScape" will have so much more impact then when it doesn't have to fight the stripes to be seen.

I'm not sure what else I'll do to the mantle, but I like where it's heading so far and I"m loving my "new" mirror.

Monday, September 07, 2009

Eek! A Mouse!

I saw a vinyl decal on a website last week (and for the life of me I can't remember where) that had a mouse hole and a clothes line on it with tiny little clothes on it.  I thought it would be perfect for the boys' room.  I kept it in black except for some tiny little flames on the mouse's shirt to mimic the flames that we have going on the roman shades and the light switch.

Here's a pic with the light switch included:
If you'll notice, this is as wide as this piece of wall gets.  There is molding to both sides and on the left is the boys' closet.  The mouse hole fits perfectly here.    It's a small, but fun detail.

And here's a close up of the mouse hole:

The color is a bit faded thanks to the camera flash, it's a bit darker in real life.  And yes, for the record, mice have a real problem making their mouse holes stand up straight and not lean to the right.

*****
Edited: because I forgot to mention the supplies used.  These are just basic acrylic craft paints.  I also used a black sharpie to clean up the lines a little bit.

Saturday, January 20, 2007

Simple easy nursery

I was discussing decorating nurseries with a friend recently and we were talking about how difficult it is to find accessories for themes that are not as "popular." For my second son's nursery, I wanted to go with a cowboy theme. Do you know how difficult it is to find cowboy stuff for a child's nursery?

This is how I solved my problems. Please remember that you can use these ideas for other themes besides cowboys.

First, the no-sew window treatments. I was incredibly short on a budget. So I went with bandanas. At places like HobbyLobby or Michaels or Joann's you can find a large selection of bandanas. Not just country themed ones either, you can find them with flames, patriotic flags, pink ones with dolls, the sky's the limit. Once you have the bandanas, just fold them over a simple, cheap curtain rod where the point hangs down. I had several to use and just overlapped them a little so that it brought more color and interest to my makeshift valance. I pinned the front and back of the points together towards the tip to keep them from waving around so much when the ceiling fan was on. Here's the result:

Next was artwork for above the crib: Draw/Paint/Sketch it yourself, or better yet, have another child do it. Whether you have another child already to draw it for you or cousins, nieces, nephews or even just a child down the street, your new baby will adore artwork created by these little artists. Have them do their artwork on and 8 x 10 piece of paper, mount it on construction paper (remember this is for those of us with no budget) or poster board and frame it. I put mine in the acrylic box type of frame and placed them right above the crib. You might want to move them up a bit higher than I've done mine since now my little guy keeps trying to play with them.

Next, you have the little accessories that make the room. Notice the comforter that is hanging over the crib rail? It's a simple quilt with different blue and white squares that leant itself very well to the cowboy them. Keeping your basics simple like this is both inexpensive and will put more emphasis on the accessories that you choose for your room. My oldest son already had a stick horse, so I hung this on the wall as well (with an accompanying cowboy hat of course).

I raided my older son's room once again for cowboy boots and hats to spread around the room. I already had a cactus (which will have to be removed soon I'm sure, though he hasn't noticed it yet) so that went into the room as well. At a flea market I found a horse shoe coat rack/hanger for a couple of dollars and on ebay for a mere $11 bucks I got a cute 1950s lamp. And the rocking horse that you see was found on sale for $20 marked down from $100.
Anyone can do something like this. Flea markets, thrift stores, antique stores or even an older child's bedroom can be searched for the perfect accouterments to your new baby's nursery. And the furniture doesn't have to be all baby stuff either. Notice the above furniture? That was my grandparents. It works great with the old west theme too although the above pic doesn't do it justice.

If you keep it simple, this will be a breeze. Pick your theme, a few simple colors, a few pieces of artwork and a simple but cute set of bedding and you will be good to go, I promise!