Showing posts with label Recipes. Show all posts

Monday, June 28, 2010

Freezer Treats

I keep most of my images up in my Flickr account.  I recently had someone complain (don't know who they were) that I don't title my images.  Well, if they don't like it, that's just too bad.  While many and varied, my hobbies do not include photography.  There are so many folks over at flickr that show off their fantastic picture taking skills.  I am not one of them nor do I have those picture taking skills.  I use flickr for the blog and that's it.  Oh, and as a backup of my digital pics.  I just don't understand someone going after me to complain because I don't title my image.  Don't they have anything better to do? 

Like making Freezer Treats?


Freezer Treats have become a staple at our house.  The kids beg for them and I try my best to hide them from everyone else so that I can snack on them late at night.  :)  They are low caloried, sweet and chewy.  They satisfy the snack monster in me without packing a wallop to the hips.  Yay!

My Mom got this idea from some folks over at Weight Watchers many years ago and I thought that I'd pass it along to you.  I promise, after a couple of these, your family will start fighting over them too.

Freezer Treats:

Chocolate Graham Crackers
Fat Free Cool Whip

Break the cracker into halves, apply 1 to 2 Tbsp cool whip to the cracker, put the other half on top.  That's it!


It's so simple.  The trick though, to these becoming really good, is to make them, then pop them into your freezer and walk away for several hours or even a full day.  The crackers absorb the moisture from the cool whip and become really soft and chewy, tasting a lot like an ice cream sandwich.  Two of these babies will run about 150 calories total! 

Enjoy!

Tuesday, June 01, 2010

Baking Day!

Today was baking day at the House O' Shea!

Here's the totals of everything made: 20 tortillas, 24 Chocolate-Chocolate Chip muffins, Pizza Dough for two pizzas,  6 "Cheesy-illas" (that's 4 year old speak for quesadillas), 1lb. Venison sausage cooked up, and one large Vidalia onion.   The onion and sausage were cooked up at the same time; some to go on pizza and some to go in the freezer for a later date. 

PHEW!

This was the first time that I had made tortillas.  I always thought that this would be difficult, but it was so easy.  Here's the recipe that I used:

Flour Tortillas:

3 cups all purpose flour
1/3 shortening
Pinch of Salt
1 cup warm water

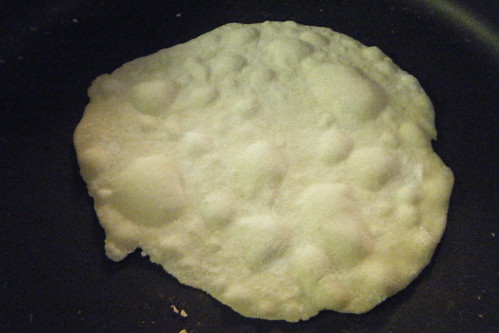
Combine all ingredients, kneading until dough forms.  Divided it all into 20 golf ball size balls.  Gave a light coating to all of them and then let them rest for about 20 minutes covered.  Then, roll out dough on a floured surface.  I was really surprised how thin these could roll out.  The dough was really easy to work with.  Stack all with wax paper between each until ready to cook.  Preheat a large griddle or frying pan.  Cook each until it begins to puff up like this:


Then flip and press firmly on the tortilla to remove the bubbles. Cook another minute and remove from pan. Here's the finished results:


I stacked these (again) as they finished cooking with the same waxed paper between each. 

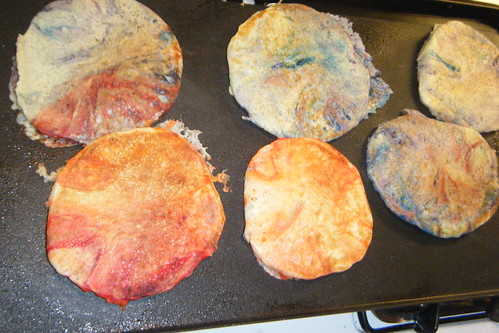
Oh, and I should mention some pancakes that got made a few days ago.  You haven't lived until you've eaten tye-dyed pancakes!


The kids loved them.

Tye Dyed Pancakes:

2 cups self rising flour
2 eggs
2 to 2.5 cups buttermilk (you don't want the batter too thick so add more if necessary)
1 Tbsp baking powder
1 tsp vanilla (optional)
Various Wilton food coloring pastes

Combine first 5 ingredients in bowl.  Then, if you are going to have several different colored pancakes, separate the batter into a few other bowls.  *Take a toothpick and dip it into the first color.  It takes only a drop!  Swirl the color into the batter and then discard the toothpick.*  Repeat that step for as many colors as you choose to have.  My boys chose three colors each, your mileage may vary.  Make sure that you don't blend the batter so much that you no longer have swirls.  You are better off swirling less than more.  Next, carefully ladle the batter into a very hot griddle sprayed lightly with cooking spray.  I use an electric griddle that I dearly love that was set to 400 degrees.  Cooking the pancakes until you see big holes form, then flip with spatula and cook until done.    These turned out so pretty it was almost a shame to cut them up!

Thursday, March 04, 2010

My First Foray into Cheese Making

I attempted my first try with making cheese.  I won't say it was a total failure, but I only got about a half cup of cheese (maybe, that might be pushing it) out of the whole recipe.

Of course, it wasn't all my fault that things didn't go well, just partially my fault.

I used this recipe to make Fromage Blanc and that's where things went downhill.  The printed recipe is not correct, but the one on the video is.   So, guess what I didn't do?  Yep, skipped the video, printed out the directions (or destructions as we call them around here) and proceeded to the actual making of the cheese.  I could have saved myself a lot of grief by just watching the darn thing.

I used a half gallon of whole milk - the two quarts that the written directions called for, and only got a half cup of cheese.  Methinks that's very little return for the investment folks.


This photo is what I got when I didn't add enough buttermilk and lemon juice.  Do you see lots of curds forming?  Me neither.  I reheated it to the proper temp three times and ended up adding more of the buttermilk and lemon juice.  It helped some, but not lots. 

But.  I kept what whey that I had and used it to make pancakes and I'm going to use the rest to make some muffins. So, it's not a total loss I suppose.  Made the pancakes healthier too and the kids never noticed what went into them.

The little bit of cheese that I did make successfully, I used in a nice little lasagna.  I layered red sauce ( made from diced tomatoes, tomato sauce and some tvp (textured vegetable protein), lasagna sheets, spinach and cheese and baked it all for about 30 minutes.  It made for a great meal.

   The Hillbilly Housewife has a frugal version of a recipe that makes this kind of cheese as well.  I might give that recipe a shot instead.  Her recipes are pretty darn good.  I ran out of chocolate syrup and made hers and it was better than what I had been buying!

I'm going to try to make cheese again and this time I swear it's going to work.  Well, I hope it's going to work anyway.  :)

Wednesday, April 29, 2009

Pineapple Cream Cheese Pie

I'm going to share a tasty recipe with you today. I could tell you that I'm doing this out of the goodness of my own heart and because it's all about giving back and blogging about wonderful things, but it wouldn't be the complete truth. No, blogging about this is more of a way for me to excuse away the gluttony that is caused by a summer pie. So, go make this and I won't feel as guilty about scarfing this pie 'cause all you folks will be scarfing it too. Misery Gluttony loves company.

My sweet fang (way too big to be a tooth) kicked it into high gear today and I had to do something about it. A few weeks ago we had a millionaire/million dollar pie. It was wonderfully sinful. This time I wanted something similar, but without huge chunks of fruit in it. It had to be sweet and tart as well, perfect for spring/summer weather.


Here it is:

Shea's Pineapple Cream Cheese Pie

Ingredients: (makes two pies)

2 graham cracker pie crusts
1 8oz. pkg Philly 1/3 less fat cream cheese
1 small carton cool whip
3/4 cup sugar
1/3 cup lemon juice
1 twenty oz. can crushed pineapple
Sprig of mint for garnish (optional)

Cream together the cream cheese and sugar, then add in the lemon juice. Once well blended, add the pineapple. Fold in the cool whip and then pour the contents of the bowl evenly into the two graham cracker pie crusts.

Chill for a couple of hours before serving to allow it to set.

Variations:
1. You can use fat free or regular cream cheese, I just used what I had on hand.
2. Leave out the sugar and use a can of condensed sweet milk instead. I would have done this, but ran out of it. It's truly decadent when you use the condensed sweet milk.

So, now that I have my pie, I need to make the guys in the house a cake. From a cake mix of course, because that's what I have and I'm lazy. This will hopefully divert everyone's attention from the yummy pie that is in the fridge.

By the way and before you point it out, Yes, I know I said I need to lose weight, but I also know that I have zero willpower. So there.

Wednesday, November 12, 2008

Knitting pics and a recipe!

Here's the progress on the first sleeve so far. It's moving slowly as usual. I'm afraid that I won't get more added on tonight since I've got choir practice though. Oh well.


And check out this beautiful loaf of Beer Bread:


This tastes so yummy and is very easy to make. It's a quick bread, but because of the beer still tastes yummy. Here's the recipe for you:

3 cups self rising flour
3 Tbsp sugar
1 12oz. bottle or can of beer

Mix first two ingredients together in a large bowl, then add the beer and continue to mix. The dough will be very sticky.

Pour into lightly greased pan. Bake at 350 degrees for 50 - 60 minutes.

Before baking I sprinkled a little oat bran on the top just for appearances sake. You could also do this with oatmeal as well.

Enjoy!

Monday, March 10, 2008

Real Southern Cookin'

Do you want some true Southern cooking? Are you dying for some deep fried goodness? I've got it for you! I've also got the recipe for the classic Southern Drink - Iced Tea.


How to cook real Southern Fried Chicken:

I'm going to start you (ya'll) out with the simplest way to make this dish. This is the height of true Southern Cuisine. If you can't make this, forget it and just come on down to the South. This is also called Soul food. It's the same thing folks, don't let others fool you. If you've got a thing against fried foods because you're all healthy and all, umm, this might not be for you. But if you feel like hardening the arteries, boy are ya'll gonna to love this!

Ingredients:

1. If you've never made it before, start with Boneless Chicken Tenders. They come in a handy pack all raw and everything. You can make this with bone in chicken pieces and they are excellent, but it takes way longer and it's a little more difficult to judge if the pieces are done.

2. Flour - I use Self Rising so it makes a fluffier/Crispier crust, but all purpose works too.

3. Salt & Pepper

4. Vegetable Oil

5. egg (optional)


First off, tell the spouse and chillins to go over yonder and not bug you. That's Southern speak for tell everybody to get lost. This isn't something you want to do with the rugrats hangin' onto your skirts.

Now, You're going to need a frying pan or deep sided skillet. I use the skillet. Add vegetable oil and turn the heat to high and leave it for a sec.

In a shallow bowl, add your flour. How much you add depends on how much chicken you're going to be fryin'. I make it about an inch or two deep in my favorite bowl (you can see it in the pic - it's a pasta bowl.)

Add salt and pepper to taste. Yes, I said taste that raw flour. That's a mistake a lot of people make in cooking, they don't taste as they add things. You haven't added raw chicken yet to the mixture so it's perfectly safe to do this. When you add the S & P, you want to be able to just taste the salt. If you taste it immediately you either haven't mixed it in well with the flour or you've added too much. If the latter is the case, add a little more flour to the mix. You may also pretend to be Colonel Sanders and add random spices - play around with the spices, it's fun!

Now for the chicken. Pat it down a little and make sure there is no moisture on it. You'll notice in the pic that I haven't done this step yet. You can dip it in egg if you wish or skip that step.

Nekkid Chicken


Take a tender (in egg or not) and put it into the flour. This next step is critical: Don't just barely put it into the flour. SMUSH it in the flour, then turn it over and do it again, and again and one more time. As I do this, I also push more flour onto it. You want this sucker to be very thick with flour.
Chicken properly clothed


Take a minute to check your oil. How can you tell when your oil is hot enough? Take the wrong end of a wooden spoon and put it into the oil. If you see some bubbles forming around it like it's boiling, the oil is ready, if not, give it another few minutes. If it's ready, turn the heat down a bit to Med. High, otherwise you'll have oil spattering everywhere and your chicken will be too brown, too fast.

Place the prepared chicken piece into the oil. Use tongs if you've got them or a large spool with a long handle to do this. Please be safe, this is a dangerous dish (and messy) to prepare. Oil hurts, trust me, I learned it the hard way.
Definitely messy

You can prepare side dishes at this time. This is a dish that takes time to prepare, especially if you use bone-in chicken. It's going to take about 4-6 minutes per side to cook. When both sides are a pretty golden brown, remove from skillet and place onto towels to soak up the excess oil on it. I put a paper grocery bag underneath three or four paper towels for this. Oil will go right through the towels, but not the bag. The bag is optional as well of course.
MMMMMM!

Please double check to see if the chicken is done. Cut it in two and look at the meat. If it's white you're set, pink, put it back in to cook a little longer.


If you make this recipe, or have any questions about it, let me know! I'd love to know how it turns out and I'll gladly answer any questions you may have.


Southern Iced Tea:

You can't have the above dish without Southern Iced Tea. I mean, that would just be plain ol' UnAmerican!

I've traveled around the World and have found that the only place you can order this is in the South. Oh, you can order it, but it comes unsweetened, yuck! They also look at you funny (like you've sprouted two heads) when you order Sweetened Ice Tea.

Anyway, here's how to do it properly:

This recipe is for 1 gallon. Sorry, it's the only amount I know how to make at a time.

Ingredients:

3 large family tea bags (can be caf or decaf)
Pan/Pot - not a dinky sauce pan either - a pot (see pic)
Water
Gallon pitcher/container
Sugar 3/4 cup to 2 cups (your choice see below)

Fill pot full of water and turn heat on high. You want to make sure the water is almost boiling, but not a full boil. If it gets to a full boil, turn off the heat and let it sit a minute. Tea is one of those things that if you let it boil, it can turn bitter, so be careful. You want to see teeny tiny bubbles barely floating to the top. When this happens turn off the heat. Place the 3 tea bags in the water and walk away. Yes, I said walk away. It needs to sit a spell and steep. You can leave it for 15 minutes or 30, but not more.


Why? Because of the Sugar!

Get your pitcher out. It's time to add some sweetness. How much? Depends. I don't like my tea to be syrupy sweet. I add a little less than 3/4 cup of sugar per gallon.

I have an Aunt (that's pronounced Ain't down here) that likes the syrupy stuff. It's two cups for her gallon of tea. In her defense, it's because of the lemon. People who normally like it this way add a bunch of lemon to their tea. It's quite good that way actually.

You want your sugar to be able to dissolve, so don't wait until your tea on the stove is too cold.

Pour the pan of tea into the pitcher with the sugar. Stir together. You will probably not have a full pitcher. You could use a dutch oven full of water I guess to make your tea, but that's not needed. So, add more water or ice or both until the liquid level is at the top of the gallon pitcher/container.

Your tea may look ready, but it's not. It needs to sit in the fridge for a while. It will get sweeter as it cools off. Taste it when it's cold. That's when you'll know if you've added the right amount of sugar really. It's all according to your preferences. If it's overly sweet, add lemon this time and cut back on the sugar amount next time.

Enjoy!

Monday, July 23, 2007

Croquettes!

Hi there!

I have absolutely no knitting to show you. Things are moving quite slow in that department. I did cast on for the corset again. This time using the i-cord cast on that Annie suggested using the first time she published the pattern. Why it disappeared from the pattern, I have no idea. The only reason I learned about it was from reading other blogs and forums and reading up on how others progressed with the pattern. It is definitely more stretchy than what I previously used and I really like it much better.

I do however, have a recipe for you today. This is a comfort food dish for me. My mom used to make this quite a bit as we were growing up. Since my husband is allergic to fish, I have to use the chicken substitute, but it's really much better with the salmon. So without further ado, here's her recipe with a few comments here and there from yours truly:

Salmon (or Chicken) Croquettes

vegetable oil
1 large can of salmon, undrained (you can also substitute a can of chicken)
1 large egg
salt and pepper to taste
1/2 cup cornmeal mix (MIX, not straight cornmeal)
buttermilk - very small amount (see below)

In a skillet or frying pan, add vegetable oil until bottom is covered. Heat on Medium heat until it is hot enough for frying.

Mix all ingredients except the buttermilk. At this point the mixture should be pretty thick. If it's not, add a bit more of the cornmeal mix. Now that you've gotten it good and thick, thin it down again with the buttermilk until it is just thin enough to dip with a spoon. (If you add too much buttermilk, you can always thicken it up again with the cornmeal mix). Adding the buttermilk not only thins it, it also helps the croquettes brown better.
about this thick

As the spoonful of mixture is dropped into the oil, they should spread slightly.

Fry these until both sides are golden brown. Place them on folded paper towels to soak up any extra oil from the frying.


Please ignore the one on the right. This became a little more crispy than is should've when the cook had to go rescue a 16 lb. cat, the tv remote controls and an elder brother from the octopus arms of the 18 month old.


Enjoy!

Saturday, May 05, 2007

Pancakes and Snapdragons

When we were growing up, we used to be so excited when my mother would cook us up a big 'ol batch of pancakes. Not in the mornings however, but for supper! Now, as a mom, that's what I do. It has completely become my "cop out" meal. That's my go-to meal when I either don't have much time to cook or when I'm feeling lazy. It's also super cheap. If you're trying to stretch out your grocery budget, this is a great recipe to do it with. Not necessarily nutritious, but tasty!

Here's my Mom's recipe with my modification:

1 egg
1 cup flour (I use self-rising for a fluffier pancake and since I like my batter a bit thicker I add a 1/2 cup more)
1 cup milk

Mix all together in a med. bowl with a whisk til blended. Spray a frying pan or griddle with cooking spray and Heat on Med-High. Once the pan is hot, spoon or ladle onto the pan. The amount is up to you, depends on the size you like your cakes. Let it sit for a minute or so. You should see holes popping up all over the pancake. When you do, flip it over with a spatula. When both sides are a nice golden brown, you're done. Pop that puppy on a plate and smear with butter and syrup!


Here's a pic of some pretty snapdragons from my MIL's gorgeous garden. I swear she and my FIL have green thumbs that rival the jolly green giant's. One day I'll get a shot of their garden that they ripped out their whole front yard to plant. (We thought they were nuts at the time, we were wrong.)

Friday, April 13, 2007

Scrubs, Wallpaper and Yarn

I made a yummy sea salt scrub for the bath/shower a few days ago. This is super easy and fun to make at home. Now please understand that I do tutorials the way that I cook. I do things by approximation and no two batches/recipes are ever the same. I do things by feel, taste or smell. I have never been accused of being a perfectionist and don't intend to ever be accused of it. As long as what I'm doing is close, that's fine by me. As mentioned in a previous post, this is why I am a crafter, not a chemist.

The ingredients are super flexible as well. There are endless combinations of items that you can use. You need sea salt, oils, glycerin and essential oil for scent. That's it. How much of each? That's where the fun comes in. You get to decide!

For the scrub part, I used sea salt. The one I bought from the health food store is fairly fine. If you want more of a scrub you could use a coarse salt. You really don't even have to use a specific kind of salt here. Sea Salt, Kosher - all will work fine.

Put your salt in a bowl. How much you use is up to you - (see, I told you I approximate and I'm about to do it again too!) Now that we've got the scrub part, let's add the stuff that makes your skin feel so soft.

I used some of each of the following: Avocado oil, olive oil, glycerin and essential oil. You can change out the oils if you would like. Jojoba would be great in this. How many drops of essential oil you use is pretty much up to your nose (as is the scent that you pick.) I added a few drops of spearmint. As anyone in my family knows, I adore mint, especially mint teas.

Basically, you want the salt to be really wet. Like I mentioned above this is approximation at its finest. You should not have a dry mix. You also don't want it to be a soup either. Meet somewhere in the middle where the salt is overly shiny.

Put your mix in a small container and shower away! Your scrub will separate. Don't worry, just swirl it around with your hand as you scoop it out to use it.

I guarantee your skin will feel fantastic when you exit your shower.


Oh, and that little bit of wall paper you see behind the ingredients? It's absolutely hideous and was in the house when we moved in. We've been afraid to tackle changing it. You see, the idiots before us had 3 layers of the stuff on top of each other and that was on top of a wall that was never primed. We know this because the rest of the rooms in the house that we have changed have been this way and we really don't want to change it ourselves for fear of destroying the sheet rock. Plus add in no money and two children that like to "help" and you have a recipe for disaster.

Two funny things about it though?
1. Anyone over 70 that has entered our home has loved it.
2. Any artwork (or anything else for that matter) that you hang disappears into the wall paper. I kid you not. I hung a Christmas wreath up on one of the walls and noone ever noticed it. noone. Here's a pic of it in all its hideous glory:


For any knitters interested, I've got yarn up for auction at Ebay: http://cgi.ebay.com/ws/eBayISAPI.dll?ViewItem&item=330109158159
It's a cotton/nylon blend. See the pic below.


Thursday, February 08, 2007

Better life through crafting. i think.

My friends just think I'm a nut, my family knows it.

My husband called me a chemist today. I prefer to be called a crafter. See, a chemist knows what he is doing as he experiments. A crafter does the experiment and hopes for the best. What started this was that I decided to try and make my own laundry detergent today. I found this on a frugal site (can't remember which) and thought it looked like fun. Here's what I used: 1/6th of a bar of fels naptha soap, 1/4 cup washing (not baking) soda, 1/4 cup borax. You need to grate the fels naptha soap - it practically grates itself when you use a serrated edge knife. Then add this to 3 cups of water. Cook this on low heat (if it boils, you get soap suds. I know cause i did it. told you I was a crafter.) Once the soap is dissolved in the water, add the soda and borax. Stir until mix thickens. Remove from heat. In a 1/2 gallon container, put in 2 cups hot water and add mixture to it. Stir or shake (depends on your container) and mix well. Fill up rest of the container with hot water and re-mix. Put the container away for 24 hours or until thick. Use 1/2 cup of the mix in every wash load. Haven't tried it yet. Mines still in the 24 hour sitting stage, I'll give an update later.

kinda looks like cheese, don't it?


Ok, I'll admit it. I jumped onto the "no-knead bread" bandwagon. You know what? It came out beautiful and yummy, if a bit flat. Next time, I will make it in a smaller container so it'll be taller. I used less water and added more salt due to other posts that I've read on the net about this subject.
mmmmmmmmmm!