
I'd been waiting on my KnitPicks order to arrive on my doorstep and it finally happened yesterday afternoon. Yeah!
I cast on today for Bella Paquita for the Sexy Knitter's Club KAL. Technically I'm jumping the gun as the KAL is not set to begin until the 21st. I'm not sure that 3 days head start is really going to matter. I'm not a super quick knitter, so we'll see what happens.
I immediately began reading and then re-reading Marnie's pattern. My comfort zone is really with long drawn written out directions, not charts. Guess what this pattern is all about? Charts!
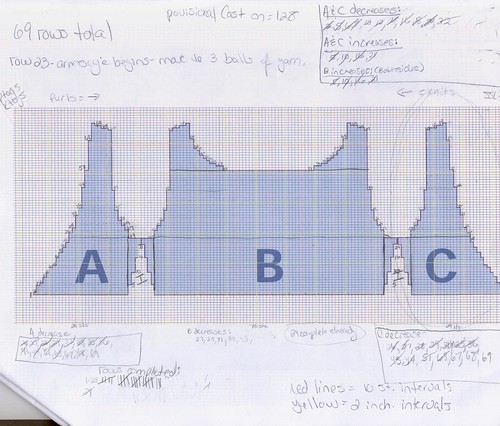
So here's what I did to start. I'm working on the Top chart in a size Small.
Reading charts is a little like reading Chinese (okay, I'm exaggerating, but bear with me) you need to start at the bottom and read right to left.
First thing I needed to do was to count how many sts to cast on. That would be 128.
Second, I wanted to know how many rows total that I would be working on: 69.
Third, there are decreases on either side of the pattern. I needed to decide what kind of decreases I wanted on each side. I chose to do ktogs on side A and and ssls on side C. You can choose as you like.
Fourth, to help me keep everything straight, I marked up the chart a bit (I'll show you that in a sec.)
Fifth, I marked what kind of stitch I would be doing in what direction on the chart. This helps me know which way to look on the chart. This won't always help with other stitch patterns, but it works on stockinette done flat.
Sixth, I marked what rows I would need to decrease on in a little chart at the top.
Seventh, I know that on row 23 I will need to move from one ball of yarn to three and marked that in the chart.
Here's my working chart notes:
Click on pic to enlarge (edited due to me being an idiot - math are hard!)
Now to experts with charts these steps will seem a no brainer. But I know that others, like me, have difficulty with charts and I hope that by doing this "out loud" so to speak, I can help the chart newbies.
I got the chart written up and then ran into the provisional cast-on. This is officially my first provisional cast on. You can go to Knittinghelp.com's cast on page and scroll down for directions on the invisible provisional cast on.
I cast on the 128 and began knitting. I placed markers between A and B and then B and C. For those who don't know, you can work this section in one piece if you want. You begin from the bottom up. You ignore the white space in the chart from rows 1 to 22. Pretend it's negative space and doesn't really exist. (ETA - except for the increases, don't forget those, they're kinda important :) ) easy peasy. When you get to row 23 though, you need to work each part, A B & C, in separate pieces which calls for separate balls of yarn.
Then, I had an attack of poor self confidence. I began second guessing myself. What if I was all wrong? So what did I do? I emailed Marnie and asked her to hold my hand. She answered back really fast and calmed me back down and sent me back out to knit. Whew!
The only problem I had after that (so far) was the 2 yo. grabbing the ball of yarn, throwing it and eventually unwinding it. That one, I can handle. :)
I"ve never made anything from a chart like that. For me, it actually seems like it would make more sense than the long drawn out directions. I'm a visual person like that, though.
ReplyDeleteHmmmm, maybe I'll try it sometime. As if my 3-year-old lets me knit enough to actually make a whole sweater. HA!